Upgrading iFIX and Historian: Learnings on Interopt
Just like with iFIX, depending upon your system, you may want to do an in-place upgrade, or a new system for your Historian server. Except in small systems, your Historian server typically resides on another machine.
In Place Upgrades
To upgrade your Historian, you should:
- Back up all the Proficy Historian archive data files (*.iha), configuration files (*.ihc), and any other backup files you maintained. By default, you can find these files in the c:\Program Files\GE Digital\Historian Data\Archives folder. Make a copy of those backup files.
- From the Add or Remove Programs feature in the Control Panel, manually uninstall Historian. Do Not Delete Archives when prompted.
- Restart your computer.
- Install Historian as described in the Historian Getting Started guide.
- After the install completes, restart your computer.
- It is very important not to forget this step, and to restart your computer.
- Make sure the Historian Archiver is running.
- Restore your Proficy Historian archive using the Historian Administrator.
- Copy your configuration files (*.ihc) to the Archive folder.
- Install the Historian Client Tools and the iFIX Collector on your iFIX SCADA ServerWhen upgrading from a previous version of Historian, Enforce Strict Client Authentication and Enforce Strict Collector Authentication should be disabled on the Historian Server to allow for compatibility with older clients or collectors that cannot be upgraded concurrently. It is recommended that all clients and collectors receive a timely upgrade to the latest version of Historian, which permits enabling both strict client and collector authentication on the server for the highest security configuration. By treating clients and collectors separately, it is possible to accommodate new and legacy authentication during the upgrade process. However, upgrading all clients and collectors to the latest version immediately will achieve a higher level of security. The two options, Enforce Strict Client Authentication and Enforce Strict Collector Authentication, permit flexibility during the upgrade process by selectively accommodating legacy clients and collectors.
- Configure iFIX and your Proficy Historian Server.
New System Updates
.The following tables describe the process for configuring iFIX to run with Proficy Historian:
Configuration Process - New Install of Historian
|
Stage |
Description |
|
1 |
Install iFIX. |
|
2 |
Install Proficy Historian. |
| 3 |
Install the Historian Client Tools and the iFIX Collector on the iFIX computer. NOTE: When configuring the iFIX collector from the Historian 9.0 media, see the additional steps below. |
| 4 |
Define your security strategy for Historian and iFIX. Be sure to review the Historian security considerations in the "Implementing Historian Security" chapter of the Proficy Historian Getting Started guide before getting started. You may need to temporarily enable or disable these options during the installation process. Additionally, plan your iFIX security by reviewing the "Configuring Security Features" e-book in the iFIX e-books. If iFIX is not running as an Administrator, be sure to review the "User Privileges for Starting a Collector" topic in the Historian e-books as well. |
|
5 |
Start iFIX and the WorkSpace. |
| 6 |
On the iFIX computer, configure the iFIX Collector:
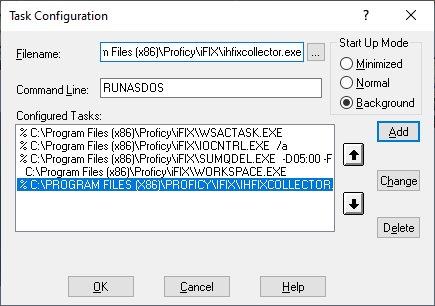
IMPORTANT: When you add the iFIX Collector to the iFIX SCU Task list with the RUNASDOS command line, then the iFIX Collector will automatically start when iFIX starts, and you will not need to start the iFIX Collector manually. Command Line 1: RUNASDOS Use the RUNASDOS command to start default iFIX Collectors (applies to all versions of Historian except Historian 9.0 Collectors).
Command Line 2: SERVICENAME=COLLECTORSERVICENAME Use this command to start the iFIX Collector to run as a Service. For example, in the SCU task list, enter the command SERVICENAME=ihFixCollector with the startup mode as Background for the ihFIXCollector.exe. This example assumes that a service called ihFixCollector corresponding to the ihFIXCollector.exe application exists in the Windows Services list. The service name might be different in your Windows Services list. For default IFIX collector it is ihFixCollector. Command Line 3: NOSERVICE Use this command line to start the default installed iFIX collector. You can also double-click the Start iFix Collector.bat file available in iFIX install folder to start the default Installed iFIX collector with the NOSERVICE command. For other instances of collectors use: NOSERVICE REG=iFixCollector1 where iFixCollector1 is the collector instance name provided in the Historian settings in Configuration Hub. After you make this change, launch iFIX and confirm your Collector starts. For Historian 9.0 and later versions , after you install the Historian Client Tools and iFIX Collector on the iFIX Server computer, you can register the iFIX Collector and create other instances of it from Configuration Hub. Refer to the Historian documentation for detailed steps on working with collectors. Use Configuration Hub with Historian to manage the collector. For Historian 9.0, you must add the instance of the iFIX Collector with Configuration Hub, as the default iFIX Collector is not created by install. The RUNASDOS command is not supported for Historian 9.0. |
| 7 |
If using multiple Historian servers that are not mirror nodes, perform the following steps to add iFIX data: Add iFIX Data to Two Different Historian Servers which are Not Mirror Nodes (Historian 9.0 and Greater) Starting with Historian 9.0, you can use Configuration Hub to create multiple server instances and it will create the necessary registry entry and multiple instances of the ihFIXCollector.exe that can be run. -OR- Add iFIX Data to Two Different Historian Servers which are Not Mirror Nodes (Earlier Than Historian 9.0) If you need to send iFIX Data to two different Historian Servers which are not Mirror nodes:
|
|
8 |
Restart iFIX to start the Collector. |
|
9 |
Configure iFIX to automatically add tag data to a single Historian server (the FIXTOHIST process is used in the background to do this). This only works if only one iFIX Collector is being used. In the iFIX WorkSpace, on the Administration tab:
|
Other Considerations
Multiple Databases
Only a single, local database is supported with Proficy Historian. If you want to use multiple databases, you may want to use Proficy Historian separately from iFIX. When used together, Proficy Historian does not recognize tags from the iFIX database with the same name as different tags, even though the source is different. So, tags that exist in your iFIX database are ignored. The data that is populated comes from Proficy Historian, not from the iFIX database. To avoid this problem, verify that each tag has a unique name.
When using multiple iFIX databases that have the same node name and the same tag name, Proficy Historian will be unable to discriminate a tag coming from one node with a tag coming from another node, and these tags will be subsequently be ignored. It is best practice to not use the same iFIX node name on multiple nodes.
For example, you have a tag called AI1 in both Process Database 1 (PDB1) and Process Database 2 (PDB2). Both tags are added to Proficy Historian as FIX.AI1.F_CV. If you reload PDB1 and then PDB2, the AI1 tag is overwritten in Proficy Historian.
Collection Delay
When iFIX and Proficy Historian are used as an integrated application, rather than as separate applications, it takes longer for tags to update if the Collector is running. Additions, deletions and modifications of tags may take twice as long to display – approximately two minutes, instead of one – than if each application was used separately.
Collectors
If you choose to use Proficy Historian, not all installed collectors will be available for selection as the default Collector. Because this feature only supports collectors that read data from iFIX, the collectors available for selection are limited to the following:
- iFIX Native Collector
Electronic Signatures
If you use electronic signatures, then you should probably not use the integrated Proficy Historian feature. If a tag requires an electronic signature in Proficy Historian and does not in iFIX, and a user makes a change in iFIX, the user is not prompted for a password. Instead, the change is made, bypassing Proficy Historian's electronic signature requirement.
Spare1 Fields
When used with iFIX, the Proficy Historian Spare1 fields are used to keep track of tags that were added or modified by iFIX. When you enable Collection for a tag in the iFIX Database Manager (on the Proficy Historian tab, in the Collection Options area), the Spare1 field is assigned to iFIX. iFIX controls the creation or modification of this tag in Proficy Historian. In other words, iFIX becomes the owner of the Spare1 field. The Spare1 fields are written to when an iFIX tag is added for the first time from iFIX to the Proficy Historian Server. The Spare1 field contains the iFIX database name.
If you want to use the Spare1 field in Proficy Historian to allow data to be written to Proficy Historian from a third party application separate from iFIX, you need to Disable Collection on the tag from within iFIX (which is the default setting for any new tags you add in iFIX Database Manager). When disabled, Proficy Historian collection is not enabled for the tag and the tag is handled exclusively by Proficy Historian. When the tag is being handled by Proficy Historian, it cannot be modified or deleted from iFIX.