iFIX gives you many ways to change the appearance of your picture on screen or, conversely, keep it looking exactly the same so you don't lose the perfect view. For example, you may want to magnify your picture so that objects change size, perhaps allowing you to study them in more detail. The following sections show you how to work with different window views.
Most of the functions described can be accessed using the View menu or tab, or using the picture pop-up menu. You can also change certain picture properties using VBA. Refer to the Writing Scripts manual for more information.
Zooming In and Out of Pictures
The viewing area of a picture is like an adjustable camera lens; it allows you to magnify or reduce the image on the screen. Magnifying an image (zooming in) lets you work on detailed areas of your picture. Reducing an image (zooming out) lets you work on the overall structure of the picture.
You can choose four different percentages of magnification when zooming in and out of pictures – 50%, 100%, 150%, or 200%. By default, the viewport is set at 100% view magnification, giving you the maximum viewable amount of your picture. When you change the magnification of the picture using the zoom function, you change the width and height of the picture's viewport, but not the size of the objects in the picture. Objects appear to get bigger or smaller, allowing you to view more or less detail, but they are actually the same size.
NOTE: When zooming in and out of pictures, grids may not appear in the picture properly.
You can use Zoom with both Logical and Enhanced Coordinate Systems; however, Zoom acts differently with each coordinate system. That is, with the legacy Logical Coordinate System, you had to decrease the Zoom Factor to increase the Zoom Percentage. With the Enhanced Coordinate System, you must increase the Zoom Factor to increase the Zoom Percentage.
- With the Logical Coordinate System - Zooming In (greater than 100%) is applied by reducing or decreasing the viewport; thus, the zoom factor is less than 1. ZoomOut increases the viewport, thus, the Zoom Factor is greater than 1.
- With the Enhanced Coordinate System - Zooming In to a picture increases the Zoom Factor, and Zooming Out reduces or decreases the Zoom Factor.
The following table lists examples of zoom percentage and corresponding zoom factor for each coordinate system. For example, a zoom percentage of 200% is represented as a Zoom Factor of 0.5 for the Logical Coordinate and 2.0 with the Enhanced Coordinates System.
|
Zoom Percentage |
Zoom Factor - Logical Coordinate |
Zoom Factor - Enhanced Coordinate |
|
50% |
1.5 |
0.5 |
|
100% |
1.0 |
1.0 |
|
150% |
0.75 |
1.5 |
|
200% |
0.5 |
2.0 |
IMPORTANT: Scripts written in for Logical Coordinate System must be changed for the Enhanced Coordinate System. In particular, when using the Zoom Property with scripts in pictures that have been upgraded to use the Enhanced Coordinate System, you must change the script to reflect the new behavior. For more information on Zoom Property and changing scripts, refer to the iFIX Automation Reference e-book.
NOTE: For Logical Coordinate System pictures only, y/SHIFT while clicking and dragging a corner of the window. This makes the object appear to change shape without cCTRL ou can accomplish the same function of a zoom by simply pressinghanging the viewport, just like a zoom. For pictures that use the Logical Coordinate System, refer to the Key Sequences that Change the Picture Size table in the Determining a Window Sizesection. This key sequence does not apply to pictures that use the Enhanced Coordinate System.
Default View and Full View
NOTE: This option does not apply to pictures that use the Enhanced Coordinate System.
If your picture uses the Logical Coordinate System and you make changes to your window, you may decide that you prefer the original view. To restore the original view, use one of the following methods:
- Right-click the picture and select Default View from the pop-up menu.
- Select Default View from the View menu (Classic view).
- Click View and then Default View from the Picture group on the View tab (Ribbon view).
Your picture will appear as you originally created it before making any changes.
If you make the size of your window smaller, you can return the window to full view by selecting Full View. The Full View function expands the size of the window and changes the viewport. You can also perform a full view by pressing <Shift> and dragging the window to fill the screen of the window.
Fitting the Picture to Window or Window to Picture
NOTE: This option does not apply to pictures that use the Enhanced Coordinate System.
If your picture uses the Logical Coordinate System and you adjust the window size of your picture, you may want the objects in the picture to be accurately represented within the new window size. To fit the picture to the new window, use one of the following methods:
- Right-click the picture name in the system tree and select Fit Picture to Window from the pop-up menu.
- Select Fit Picture to Window from the View menu (Classic view).
- Click Window and then Fit Picture to Window from the Picture group on the View tab (Ribbon View).
The picture is adjusted to the new window size, so that the objects in the picture are the same size relative to the new window.
To adjust the size of the window to fit as much of your picture as possible:
- right-click the picture name in the system tree and select Fit Window to Picture from the pop-up menu,
- select Fit Window to Picture from the View menu (Classic view), or
- click Window and then Fit Window to Picture from the group Picture on the View tab (Ribbon View)
If the viewport stretches beyond the boundary of the picture, scroll bars are added to the picture.
NOTE: Scroll bars may be added when a picture is created using the Picture wizard in Classic view and then opened in Ribbon view. If this occurs in a picture using legacy Logical Coordinates, select Fit Picture To Window from the right mouse menu and save the picture to eliminate the scroll bars. Use Zoom To Fit for Enhanced Coordinate pictures.
Updating Window Location
The Update Window Location function allows you to retain a specific picture configuration, maintaining the document, window, and viewport sizes that you create. When you open the picture later, or switch back to the configuration environment after viewing it at run-time, the picture appears exactly as it did on the screen when you originally created it.
In this way, Update Window Location is not the same as saving your picture. Saving alone does not retain window properties, and does not guarantee that your picture will look exactly the same when you re-open it again at a later date. So be sure to save your picture after you have updated the window location to your exact specifications.
Update Window Location is an effective way to create pop-up windows for your application that appear exactly the same, regardless of what resolution they are viewed on. To use this function, employ one of the following methods:
- Right-click the picture in the system tree and select Update Window Location from the pop-up menu.
- Select Update Window Location from the View menu (Classic view).
- Click Window and then Update Window Location from the Picture group on the View tab (Ribbon View).
Next, save your picture.
Zoom to Fit
When pictures are created or upgraded with the Enhanced Coordinate System, the Zoom to Fit option automatically scales the entire picture to fit within the current screen while suppressing scroll bars. Objects are not distorted and retain their original shape. Zoom to Fit is only available for viewing pictures, edits are not permitted. Zoom to Fit can be used in both Configuration and Runtime modes.
Changing the Screen Resolutions
If you change the screen resolution for a picture in Zoom to Fit, the picture looks differently even though the aspect ratio remains unchanged. The objects within the picture appear to have changed size because the Zoom to Fit option makes the best use of the available screen space. If you change the resolution from:
- a lower resolution to a higher resolution, the objects in your picture appear larger
- a higher resolution to a lower resolution, the objects in your picture appear smaller
If you choose to disable Zoom to Fit (Ctrl+M) for the picture in the new resolution, the scroll bar becomes enabled and the objects within the pictures appear differently as the software accommodates the adjusted screen space.
For example:
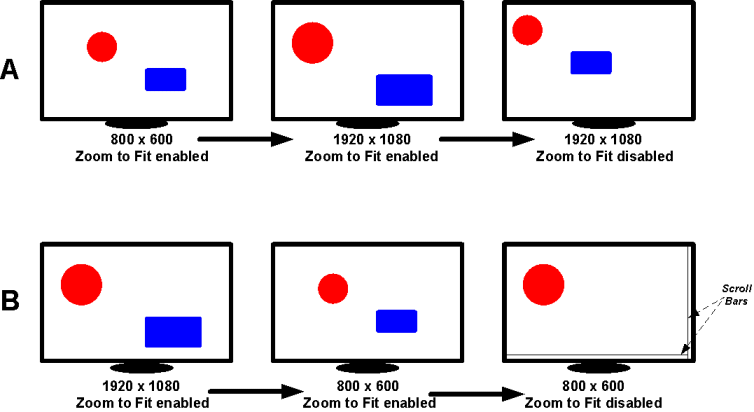
- As shown in sequence A, changing the screen resolution from 800 x600 to the new 1920 x 1080 resolution, makes the objects appear larger. When you disable Zoom to Fit, scroll bars are enabled and the images appear smaller.
- As shown in sequence B, changing the screen resolution from 1920 x 1080 to the new 800 x 600 resolution, makes the objects appear smaller. When you disable Zoom to Fit, scroll bars are enabled and the images appear larger or may not appear on the screen.

Viewing Overlaid Objects
When overlaying objects in a graphic (in configuration mode), make sure the alignment of each object is as you expect it. When overlaid objects are not aligned properly, viewing these objects in Zoom to Fit (in run mode) may not display as you expect. For example, if text is overlaid on a rectangle object and the text object is not aligned during configuration mode, when you view the objects with Zoom to Fit (in run mode), the text size may increase and hide one of the rectangle's edges. If this occurs, return to configuration mode and adjust the overlays to align properly.
How to Control How the Font in Text and Datalink Objects is Zoomed
You can control whether font in Text or Datalinks is zoomed with a setting in the FixUserPreferences.ini file. When this setting is enabled, zoom is enabled on these objects. By default, this setting is enabled. The FixUserPreferences.ini file is found in the LOCAL folder in the iFIX base path. By default, this path is: C:\Program Files (x86)\Proficy\iFIX\LOCAL.
To disable or enable this behavior, modify the RecalcTextRectOnZoom parameter in the [ShapePreferences] section of the FixUsersPreferences.ini file. For example, 1 is enabled and 0 is disabled. For example:
[ShapePreferences]
ForegroundColor=8816262
BackgroundColor=16777215
...
RecalcTextRectOnZoom=1
To disable the new behavior, set RecalcTextRectOnZoom to 0. For example:
RecalcTextRectOnZoom=1
The WorkSpace must be restarted for any changes to the RecalcTextRectOnZoom parameter to take effect.
Other Picture Settings Available through the FixUserPreferences.ini file
There are other settings that you can configure in the FixUserPreferences.ini file located in the iFIX base path (by default: C:\Program Files (x86)\Proficy\iFIX\LOCAL). These include: ZoomToFitFromCenter, ThickEdgeLinesWithZoom, and SmoothShapes. After changing any of these settings in the FixUserPreferences.ini, the WorkSpace must be restarted for these changes to take affect.
ZoomToFitFromCenter
ZoomToFitFromCenter can be added to the [AppDesignPreferences] section of the FixUserPreferences.ini. The default value of ZoomToFitFromCenter will always be “1” when ZoomToFit is enabled for a picture. When ZoomToFit is applied on a picture, objects in a picture cover the maximum view area in terms of width or height. This means that space at the right or at the bottom around objects in the picture will have less empty spaces. This is because the starting position of objects in a picture have been shifted either to right or to bottom. When setting ZoomToFitFromCenter to "0", the Fit From Center feature is disabled for all the opened documents or pictures. In this case, objects in a picture will have larger gaps (empty spaces) at the right or at bottom.
NOTE: You can also set/unset ZoomToFitFromCenter setting on individual picture through a script. For example: Me.BestFitWithCenter = False or Me.BestFitWithCenter = True. Me.BestFitWithCenter script always takes precedence over ZoomToFitFromCenter settings provided in .ini file. ZoomToFitFromCenter setting is a global setting which gets applied on the opened documents in the WorkSpace. To override this setting for an individual picture, use the help of script, like Me.BestFitWithCenter.
NOTE: Be aware that if you enable this property on pictures with lots of graphics, it may have an impact on the performance of the iFIX WorkSpace.
ThickEdgeLinesWithZoom
ThickEdgeLinesWithZoom can be added to the [ShapePreferences] section of the FixUserPreferences.ini. When this variable is set to 0 the edge lines while zooming in will NOT become thicker while shapes are drawn on a picture. By default, this value is 1, which means edges will become thicker for shapes on zooming.
SmoothShapes
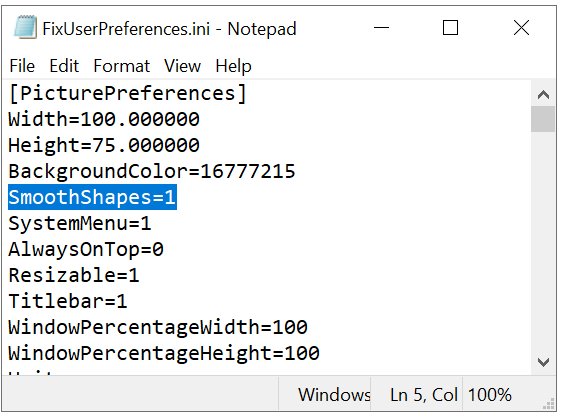
SmoothShapes can be added to the [PicturePreferences] section of the FixUserPreferences.ini. This property is used mainly for older pictures which were upgraded prior to version 6.5 and above to help improve the draw quality of shapes (a polygon, circle, arc, and so on). If you want old pictures (created in version 5.5 and earlier) which have been converted to Enhanced Coordinates, to have the Smooth Shapes property enabled globally (for all the pictures opened), set SmoothShapes to “1” in the PicturePreferences section of FixUserPreferences.ini.
NOTE: Be aware that if you enable this property on pictures with lots of graphics, it may have an impact on the performance of the iFIX WorkSpace.

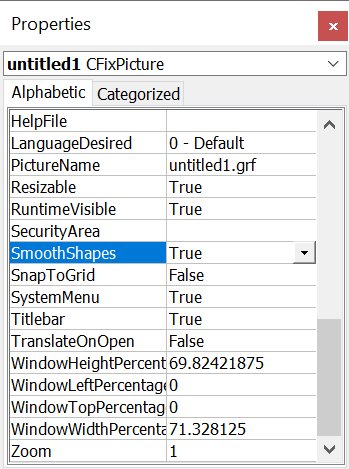
In current version of iFIX, there is also a SmoothShapes property on the picture. On new pictures this value is set to True.

NOTE: If a non-Enhanced Coordinate picture is converted to Enhanced Coordinates on upgrade, the SmoothShapes Picture property value is set to False.
Be aware that the setting in the Picture Properties does not take precedence over the setting in the FixUserPreferences.ini file. As long as one of the settings is 1 (True), SmoothShapes logic will be applied to the picture in run mode. The following table explains how combinations of these settings get applied.
|
FixUserPreferences SmoothShapes setting |
Picture Properties Setting |
SmoothShape logic applied? |
| 0 | 0 | No |
| 0 | 1 | Yes |
| 1 | 1 | Yes |
| 1 | 0 | Yes |
Example of FixUserPreferences.ini with these Settings
[PicturePreferences]
...
SmoothShapes=0
...
[AppDesignPreferences]
...
ZoomToFit=1
ZoomToFitFromCenter=1
Multimonitorsupport=0
...
[ShapePreferences]
...
ThickEdgeLinesWithZoom=1
...
Oval Shapes with SmoothShapes Enabled
When the SmoothShapes parameter is enabled, Oval shapes (Fix2DOval object) may change in size. If you do not want Oval shapes to change, enable the ConsistentOvalSizeInSmoothShape parameter. To enable this parameter, in the FixUserpreferences.ini file, under the [ShapePreferences] section, add the following:
ConsistentOvalSizeInSmoothShape=1
After changing any of this settings in the FixUserPreferences.ini, the WorkSpace must be restarted for these changes to take affect. With both SmoothShapes and the ConsistentOvalSizeInSmoothShape parameters enabled, the Oval shape size will not change in size or increase.
By default, the ConsistentOvalSizeInSmoothShape parameter is not included in the .ini file; it is considered as False (or 0), by default.


