
Administrator Actions
Asset Hierarchy Configuration
Essentials is built on the premise that, within your company, there are multiple asset records that can be organized into a hierarchy.
The baseline Asset Hierarchy configuration consists of Functional Locations and Equipment records. The highest level of the hierarchy is represented by Functional Location records which appear below the Home level of the hierarchy. Each of these Functional Locations may have any number of levels of child Functional Locations, and Equipment is found at the lowest level of the hierarchy. For example, the top level of Functional Locations might represent different sites within the organization; the second level might represent different areas within each site; the third level might represent specific machines within each area. A location representing a machine could be comprised of three pieces of equipment that make up the machine. In this example, equipment would not be directly related to locations that represent sites or areas; equipment would only be directly related to locations representing machines.
The Asset Hierarchy configuration can be modified to reflect non-baseline asset types and supports multiple relationships between assets, subject to certain constraints.
More Details: Baseline Configuration
In the baseline configuration, there are two levels reflected in the Asset Hierarchy: the Root and a secondary level. The primary level of the Hierarchy, the Root, reflects the relationships between Functional Locations. The second level of the hierarchy reflects the relationships between Equipment and Functional Locations. The hierarchy first displays the Root Functional Location, and drills down to child Functional Locations based on your selections. The hierarchy will continue to do so until there are no child relationships for the selected Functional Location. Then, using the criteria defined in the second level, the hierarchy will display Equipment records related to the selected Functional Location.
The baseline configuration is as follows:
-
Root: The primary level of the hierarchy.
- Parent Family: Functional Location
- Relationship: Functional Location Has Functional Location(s)
- Child Family: Functional Location
- Parent Priority: 0
- Display Field: ENTY_ID
- Taxonomy Category: Taxonomy Category
- Taxonomy Class: Taxonomy Class
- Taxonomy Type: Taxonomy Type
-
Secondary Level: The second level of the hierarchy.
- Parent Family: Functional Location
- Relationship: Functional Location Has Equipment
- Child Family: Equipment
- Parent Priority: 0
- Display Field: ENTY_ID
- Taxonomy Category: Taxonomy Category
- Taxonomy Class: Taxonomy Class
- Taxonomy Type: Taxonomy Type
- The link to each parent uses a different relationship family.
- A priority has been defined for each relationship family in the Asset Hierarchy configuration.
Access the Asset Hierarchy Configuration Page
Procedure
Modify the Asset Hierarchy Configuration
About This Task
Procedure
- If you want to add another level to the Asset hierarchy, select
 , and then configure the settings as described in the previous step.
 - To save the changes, select
 .The changes are saved and an Asset Hierarchy rebuild is scheduled. The changes are applied and are reflected on the Assets page when the build is complete. Select
 to view the latest build status.
Schedule an Asset Hierarchy Rebuild
About This Task
For information on scheduling a job, refer to Schedule a Job.
Procedure
- Select
 .The Edit Schedule window appears.
About the Custom Asset Hierarchy Data Loader
The Custom Asset Hierarchy Data Loader is designed to load data into the Asset Hierarchy Entity family in Essentials, and is also used to relate records in that family to other families in Essentials based on the relationship definitions defined in Family Management. You can create Custom Asset Hierarchy Data Loader workbooks for the following purposes:
-
Entity Family Data: Used to load data or records.
-and-
- Relationship Family Data: Used to relate a record in an entity family to another record in different entity family.
The data loader workbooks used by the Custom Asset Hierarchy Data Loader are created using the metadata definitions configured in your Essentials system. When the data is loaded, the Custom Asset Hierarchy Data Loader will trigger all of the associated field and family level rules, to ensure that the data is valid, but no further validation is done to the data. You should, however, verify that the intended data, records, or relationships are present in the Essentials system after a data load has been completed.
About the Custom Asset Hierarchy Data Loader Requirements
Determine Which Families and Relationships to Populate
You can determine which families are available and how families are related in Family Management. To access Family Management:
- Log in to Essentials.
- In the Applications menu, select Admin, and then select Family Management.
Security Settings
The Security User performing the data load operation must be associated with either the MI Data Loader User or MI Data Loader Admin Security Role. Depending on the type of data that the Security User wants to load, the user may need to be associated with additional Security Roles to grant privileges to create the necessary records. To determine if additional Security Role association is needed to create a particular type of record, refer to the About Roles section of the Essentials Administrative User Help documentation.
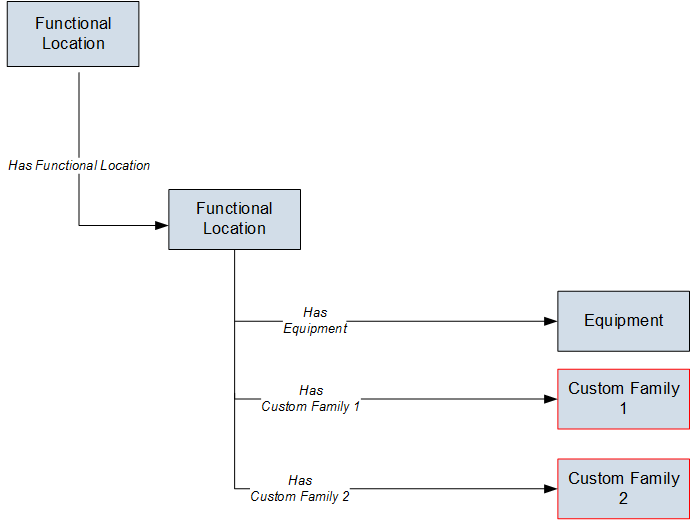
About the Custom Asset Hierarchy Data Loader Data Model
The following data model illustrates the records that the Custom Asset Hierarchy Data Loader supports. The Family records illustrated with a red border are customizable.
Custom Asset Hierarchy Data Loader Data Model
About the Custom Asset Hierarchy General Loading Strategy
This section describes any prerequisites to loading the data and the order in which the data will be loaded.
General Loading Strategy Workflow
- Determine what families and or relationships you want to populate using the Custom Asset Hierarchy Data Loader.
- Populate the Configuration worksheet.
This data loader may run on a schedule as part of the EAM data load service.
About the Custom Asset Hierarchy Data Loader Workbook Layout and Use
This section provides a high-level overview and explanation of how the data loader workbook is constructed.
In order to import data using the Custom Asset Hierarchy Data Loader, Essentials provides an Excel workbook that must be used to perform the data load.
The following table lists the worksheets that are included in the MI_AH_Entity_Dataloader.xlsx workbook.
| Worksheet | Description |
|---|---|
| Configuration | The Configuration worksheet is needed to describe the type of data that you will be loading and how that data should be handled during the data load. |
| AHEntity | Where you specify the actual Asset Hierarchy entities that you want to load. |
| LinkAHEntitytoEntity | Where you can connect an Asset Hierarchy entity to another Asset Hierarchy entity. |
| LinkAHEntitytoFL | Where you can connect an Asset Hierarchy entity to a Functional Location, Equipment, or some other asset concept defined by the Family Management settings. |
Each worksheet in the Custom Asset Hierarchy Data Loader workbook contains field values that can be mapped to the appropriate Essentials family/field.
Configuration Worksheet
The Configuration worksheet tells the Custom Asset Hierarchy Data Loader what types of data are being loaded and how the data is to be loaded, and is standard for all data loads regardless of the type of data that you are loading. The following table outlines the options that are valid or the values that are expected in each of the columns on the Configuration worksheet.
| Field Caption | Field ID | Data Type | Potential Value(s) | Comments |
|---|---|---|---|---|
| Load Data From Worksheet | LOAD_DATA_WORKSHEET | Boolean |
| The value in this column will determine whether or not the data should be loaded from the worksheet. |
| Data Worksheet ID | DATA_WORKSHEET_ID | Character |
| This column contains the name of the worksheet where the actual data is located. It needs to have the same name as the worksheet in the data loader workbook. |
| Batch Filter Column | BATCH_FILTER_COL_ID | Character |
| When the data is loaded into Essentials, it is processed in a series of batches. This column contains the Data Column ID that will be used for the batching of the data. All of the records will be grouped together by the unique values in the column specified in the worksheet. This column must also be the first column that exists in the worksheet. It must be the Column ID, which is in the second row on the worksheet and not the Field ID. |
| Primary Family ID | PRIMARY_FAMILY_ID | Character |
|
Depending on the type of data that you are working with, this will contain the Relationship Family ID or the Entity Family ID. You can also allow the data in source file to determine the Family ID by encapsulating the Field ID that contains the Family ID data in brackets (<>). For example, if in the worksheet there is a column with an ID of PRIMARY_FAMILY_ID, where each row contains the corresponding Family ID, then in this column you should put the value of <PRIMARY_FAMILY_ID>. If the Family ID in the Essentials metadata contains spaces, then you have to use this feature. |
| Primary Family Key Fields | PRIMARY_FAMILY_KEY_FIELDS | Character |
|
This column contains the Field IDs associated with the Primary Family that are used to uniquely identify a record. If more than one field is to be used, then each Field ID needs to be separated by a | (Pipe) character. In the case where you are loading data into a relationship, if no keys fields exist or are used, use the <none> constant. If the Primary Action is ACTION_INSERTONLY, then no key fields need to be specified, so you can use the <none> constant. |
| Family Type | FAMILY_TYPE |
| The value is this column should be Entity or Relationship depending on the type of data that is being loaded. | |
| Predecessor Family ID | PRED_FAMILY_ID | Character |
| When the Family Type is Relationship, this column will contain the value of the Entity Family ID that is the predecessor in the relationship. Otherwise, it should contain the <none> constant. You can also use the data in each of the rows to determine the Predecessor Family ID. |
| Predecessor Family Key Fields | PRED_FAMILY_KEY_FIELDS | Character |
|
This column contains the Field ID or IDs associated with the Predecessor Family that are used to uniquely identify the predecessor record. If more than one field is to be used, then each Field ID needs to be separated by a | (Pipe) character. If the Predecessor Action is ACTION_INSERTONLY, then no key fields need to be specified, so you can use the <none> constant. |
| Successor Family ID | SUCC_FAMILY_ID | Character |
| When the Family Type is Relationship, this column will contain the value of the Entity Family ID that is the successor in the relationship. Otherwise, it should contain the <none> constant. You can also use the data in each of the rows to determine the Successor Family ID. |
| Successor Family Key Fields | SUCC_FAMILY_KEY_FIELDS | Character |
|
This column contains the Field ID or IDs associated with the Successor Family that are used to uniquely identify the successor record. If more than one field is to be used, then each Field ID needs to be separated by a | (Pipe) character. If the Successor Action is ACTION_INSERTONLY, then no key fields need to be specified, so you can use the <none> constant. |
| Primary Action | PRIMARY_ACTION | Character |
|
The value in this column will determine the action that will be applied to the Primary Family records. If the Family Type is Entity, then the possible values are:
Deleting a record and purging a record will both delete the current record, the difference being that the purge action will delete the record and all of the links or relationships tied to that record. The delete action will attempt to delete the record, and if it is related to another record, the delete will fail. If the Family Type is Relationship, then the possible values are:
|
| Predecessor Action | PRED_ACTION | Character |
|
The value in this column will determine the action that will be applied to the Predecessor Family records. The possible values are:
If the Family Type is Entity then the value needs to be:
|
| Successor Action | SUCC_ACTION | Character |
|
The value in this column will determine the action that will be applied to the Successor Family records. The possible values are:
If the Family Type is Entity then the value needs to be:
|
| Insert with Null Values? | OPTION_INSERT_ON_NULL | Boolean |
| When setting field values on a new record, if a value coming across is NULL, the field values will be set to NULL if this option is set to True. |
| Update with Null Values? | OPTION_UPDATE_ON_NULL | Boolean |
| When setting field values on an existing record, if a value coming across is NULL, the field values will be set to NULL if this option is set to True. |
| Replace an Existing Link? | OPTION_REPLACE_EXISTING_LINK | Boolean |
|
The Replace Existing Relationship option is used to determine how a relationship is to be maintained by its cardinality definition. For example, the relationship Location Contains Asset that is defined in the Configuration Manager. It has a cardinality defined as Zero or One to Zero or One, has a Location LP-2300, and contains the Asset P-2300. If, in the data load, you assign the Asset P-5000 to be contained in the Location LP-2300, and you have set the Replace Existing Link property to True, then the data loader will link P-5000 to LP-2300 and unlink P-2300 from LP-2300. This assumes that P-5000 is not currently linked to another location. The same is true for a relationship that is defined as Zero or One to Zero or Many, or Zero or Many to Zero or One. |
| Allow Change of Family? | OPTION_ALLOW_CHANGE_OF_FAMILY | Boolean |
|
Allows the data loader to move an entity from one family to another. For example, this would allow an entity that is currently assigned to the Centrifugal Pump family to be moved to the Reciprocating Pump family. All relationships will be maintained as long as the family to which the entity is being moved allows the same relationships. Note: Because of the extra processing required, by selecting this option, the interface performance will decrease.
|
| Process Each Row as a Transaction? | OPTION_TRANSACTION_PER_ROW | Boolean |
|
When this value is set to True, each row in the spreadsheet is committed before the next row is processed. If this is set to False, then all of the records in the batch are processed in one transaction. In general, you will get better performance when processing data in a batch, assuming that the data being loaded is clean, meaning that the vast majority of records will not be rejected. |
Asset Hierarchy Entity (AHEntity) Worksheet
The following table outlines the options that are valid or the values that are expected in each of the columns on the Asset Hierarchy worksheet.
| Field Caption | Field ID | Data Type | Potential Value(s) | Comments |
|---|---|---|---|---|
| Entity Parent ID | MI_AH_ENTY_PRINT_ID_C | Character |
| This is the unique identifier of the parent value that you want to link to your entity. |
| Entity ID | MI_AH_ENTY_ID_C | Character |
| This is the unique identifier for the entity that you are adding to the worksheet. |
| Entity Name | MI_AH_ENTY_NAME_C | Character |
| The name of the asset that you are adding to the worksheet. |
| Site Reference | MI_SITE_NAME | Character |
| The site reference associated with the entity. |
Link an Asset Hierarchy Entity to Another Entity (LinkAHEntityToEntity) Worksheet
The following table outlines the options that are valid or the values that are expected in each of the columns on the Asset Hierarchy Entity to Entity worksheet.
| Field Caption | Field ID | Data Type | Potential Value(s) | Comments |
|---|---|---|---|---|
| Parent ID | <PRED_FAMILY_ID>|MI_AH_ENTY_PRINT_ID_C | Character |
| This is the unique identifier of the parent value that you want to link to your entity. |
| Predecessor Family ID | PRED_FAMILY_ID | Character |
| When the Family Type is Relationship, this column will contain the value of the Entity Family ID that is the predecessor in the relationship. Otherwise, it should contain the <none> constant. You can also use the data in each of the rows to determine the Predecessor Family ID. |
| Entity ID | <SUCC_FAMILY_ID>|MI_AH_ENTY_ID_C | Character |
| The unique identifier of the asset that is being loaded into the Asset Hierarchy. |
| Successor Family ID | SUCC_FAMILY | Character |
| When the Family Type is Relationship, this column will contain the value of the Entity Family ID that is the successor in the relationship. Otherwise, it should contain the <none> constant. You can also use the data in each of the rows to determine the Successor Family ID. |
Link an Asset Hierarchy Entity to a Functional Location (LinkAHEntitytoFL) Worksheet
The following table outlines the options that are valid or the values that are expected in each of the columns on the Asset Hierarchy Entity to Functional Location worksheet.
| Field Caption | Field ID | Data Type | Potential Value(s) | Comments |
|---|---|---|---|---|
| Entity_ID | <PRED_FAMILY_ID>|MI_AH_ENTY_PRINT_ID_C | Character |
| The unique identifier of the asset that is being loaded into the Asset Hierarchy. |
| Predecessor Family ID | PRED_FAMILY_ID | Character |
| When the Family Type is Relationship, this column will contain the value of the Entity Family ID that is the predecessor in the relationship. Otherwise, it should contain the <none> constant. You can also use the data in each of the rows to determine the Predecessor Family ID. |
| Functional Location | <SUCC_FAMILY_ID>|MI_FNCLOC00_FNC_LOC_C | Character |
| The location of the asset that you are loading into the Asset Hierarchy. |
| Successor Family ID | SUCC_FAMILY | Character |
| When the Family Type is Relationship, this column will contain the value of the Entity Family ID that is the successor in the relationship. Otherwise, it should contain the <none> constant. You can also use the data in each of the rows to determine the Successor Family ID. |
About Populating Site Reference Data
The Custom Asset Hierarchy Data Loader can be used to populate the Site Reference on Equipment and Functional Location records in Essentials. The Custom Asset Hierarchy Data Loader populates the ENTY_KEY system field and the MI_SITE_KEY system field associated with the Site Reference value to be populated. On asset records, the Site Reference is stored in the MI_SITE_KEY field, a system field in Essentials. The Custom Asset Hierarchy Data Loader uses the Site Name (MI_SITE_NAME) to translate the value to the corresponding Site Key and populate the MI_SITE_KEY field; therefore, you do not need to know the key to be able to populate the site reference. This functionality is important because this value can change from one database to another.
Steps: Populate Site Reference Using the Site Name
- On the data worksheet, add a column that contains MI_SITE_NAME in the column name.
For example, if you are working with a relationship, where a distinction needs to be made regarding which family is associated with each column, then the column name will be prefaced with the Family ID. The column name might take the form ‘MI_EQUIP000|MI_SITE_NAME’, where MI_EQUIP000 is the Family ID.
- Enter the site name to designate the site by which the asset record, once loaded into Essentials, will be filtered.
- Continue populating the source workbook, and then run the data loader.
The site reference value will filter the equipment records as determined in the source workbook.
About the Custom Asset Hierarchy Data Loader Load Verification
After loading data, you must perform the following steps in Essentials to ensure the integrity and accuracy of the data imported from the data loader workbook:
- Review the details of the import job. These details will indicate any errors that occurred during the data load. The log helps you identify any records that are not loaded.
- Run a query on the relevant family to ensure that the records have been created and populated as expected.
- Verify the imported records in Asset Hierarchy to ensure that the relationships between families have been created.
-
Verify that the assets in a Functional Location of the Custom Asset Hierarchy Data Loader exist.
To view the assets, perform the following steps:
- Log in to Essentials.
-
On the top navigation bar, select
 .
.The Assets page appears.
-
Select a Functional Location of Custom Asset Hierarchy Data Loader.