
Manual Calibration
About Calibration Event
Calibration records (also called Calibration Events) store a snapshot of the current condition of the asset that is calibrated. They are used to store the readings you have taken while calibrating a asset and to verify whether the calibration has passed or failed.
You can perform calibration in one of the following ways:
- Manual Calibration: When you perform a manual calibration, you will manually create Calibration records and enter the results into the record. When you do so, you can choose between the following options:
- Trueness: Ensures that the calibration results are close to the expected values.
- Precision: Ensures that the calibration results are close with respect to one another (low standard deviation).
Trueness, combined with precision, helps achieve accurate results. For more information on precision calibration, refer to About Precision Calibration section.
- Automated Calibration: To perform automated calibration, you will use a calibrator. In this case, Calibration records are automatically created in APM after receiving data from the calibrator.
About Precision Calibration
When performing a calibration, you must ensure that the calibration results align with both trueness and precision, especially when calibrating a device that is used for critical measurements. This will help you achieve accurate results.
- Number of measurement sets: This is the number of times you want to repeat each measurement to attain precision.
- Precision limit: This is the maximum standard deviation that is allowed between readings for a given measurement.
- Precision calibration is applicable to manual calibration only.
- Precision calibration is not available for discrete and functional test calibrations.
Example: Precision Calibration for an Analog Device
Consider that an analog device takes voltage as Input in the range of 0 to 10 DCV and gives Current as output in the range of 4 to 20 MA.
- Template ID: Analog Calibration Precision template
- Input Type: Voltage
- Output Type: Current
- Primary Input LRV = 0
- Primary Input URV = 10
- Primary Input Unit = DCV
- Primary Output LRV = 4
- Primary Output URV = 20
- Primary Output Unit = MA
- Profile ID: Analog Calibration Precision Profile
- Calibration Type: Analog – Manual
- Profile Template: Analog Calibration Precision template
- Calibration Strategy: 3U
Next, link an Equipment or a Functional Location for which you want to perform calibration.
Create or link an existing Calibration task. Now these details start appearing under Calibration Queue. To create a Precision Calibration, refer the Create a Precision Calibrationsection
Create a Precision Calibration
Before You Begin
- Ensure that Precision Calibration is enabled.
- Ensure that the Asset that you want to calibrate is linked to a Calibration Template.
About This Task
- Calibration, Analog
- Calibration, Weight Scale
- Calibration, Single-Component Analyzer
- Calibration, Multi-Component Analyzer
Procedure
- Enter values in the available fields, and then select
 .The Calibration Event is created.
 - Select The calibration results appear in the Summary section, which is calculated based on the trueness values. And the precision results appear in the Precision Result section. Only if the calibration passes for both trueness and precision, the calibration is set to pass. For more information on the calculation, refer to Calibration Management Calculations.
About Functional Test
Calibration Template, Functional Test records are specific types of Calibration Templates that allow you to perform functional tests on the asset. A functional test consists of questions and possible responses to that question.
Like other Calibration Template records, Calibration Template, Functional Test records contain setup information for functional tests. They are linked to Calibration Template Detail, Functional Test records, which store the following information that you can use to define a custom functional test for an asset:
- Instructions that describe the steps you should perform.
- Responses that correspond with each instruction.
- The sequence in which the instructions should be carried out.
Together, the combination of one Calibration Template, Functional Test record and one or more Calibration Template Detail, Functional Test records make up a single functional test.
Although Calibration Template, Functional Test records store different information than other Calibration Templates, they function the same way. You can also perform a manual functional test in the same way you perform a manual calibration, except that you should use a printed copy of the Functional Test Calibration Field Report to perform the specified functional test and write the results of the test on the printed report. The Functional Test Field Calibration Report displays the information that you defined in a Calibration Template, Functional Test record. You can print the report and use it to manually record the results of the functional test in the field, and then you can transfer the results from the report to a Calibration, Functional Test record in APM.
Example: Functional Test
Suppose you want to record information about the physical condition of the wires that are attached to a boiler. In this case, you might create the following functional test:- Rusted
- Stripped
- Loose
- Dirty
- Acceptable
Create a Calibration Event from the Calibration Events Section
About This Task
- Calibration, Analog
- Calibration, Discrete
- Calibration, Weight Scale
- Calibration, Single-Component Analyzer
- Calibration, Multi-Component Analyzer
- Calibration, Functional Test
Procedure
- Select
 , and then select one of the Calibration Event family types.Note: You can select a Calibration Event family type only if you select an Asset in the Asset Hierarchy.A blank datasheet for the Calibration Event appears.
 - Enter values in the remaining available fields, and then select .The Calibration Event is created.
Create a Calibration Event Using the Calibration Queue Section
About This Task
- Calibration, Analog
- Calibration, Discrete
- Calibration, Weight Scale
- Calibration, Single-Component Analyzer
- Calibration, Multi-Component Analyzer
- Calibration, Functional Test
Procedure
- Enter values in the available fields, and then select .The Calibration Event is created.
Access a Calibration
About This Task
- Calibration, Analog
- Calibration, Discrete
- Calibration, Weight Scale
- Calibration, Single Component Analyzer
- Calibration, Multi-component Analyzer
- Calibration, Functional Test
- Calibration, CMX
- Calibration, Summary Event
Procedure
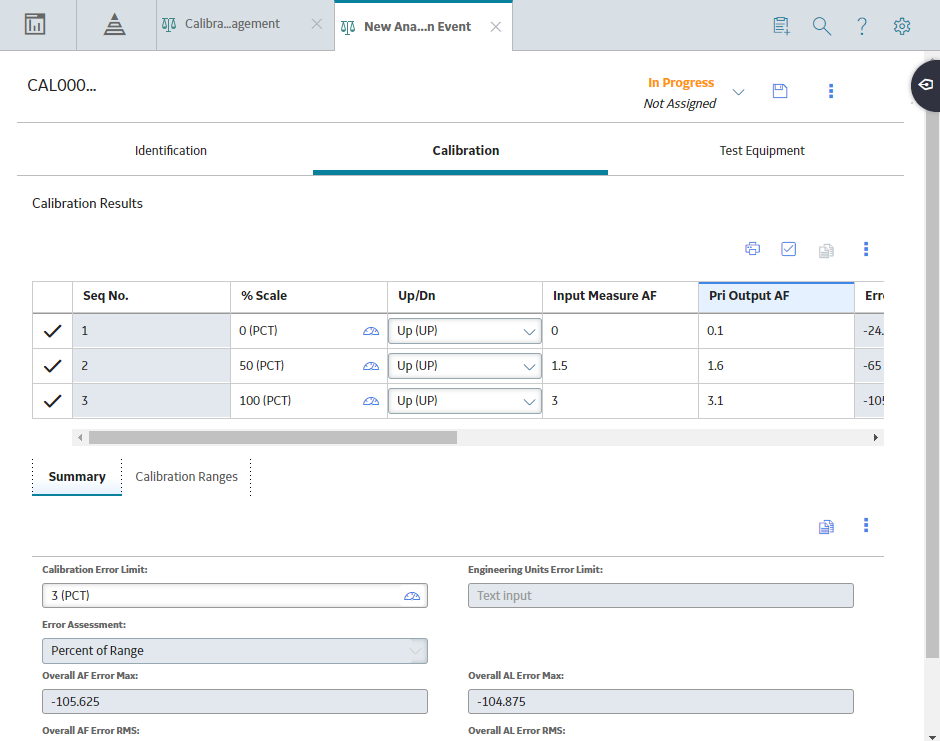
- In the Event ID column, select the link for the Calibration that you want to access.The details of the selected Calibration appear on a new page, displaying the Identification, Calibration, and Test Equipment sections. By default, the Identification section appears, displaying the datasheet for the selected Calibration.Note: As needed, you can modify the values in the available fields, and then select to save your changes.
- Select the Calibration tab.The Calibration section appears, displaying a list of Calibration Results and the summary of the Calibration Event.Note: The following image is specific to analog calibration. The image and fields differ based on the type of calibration. As needed, you can modify the values in the available fields, and then select to save your changes.
Access a Calibration Summary Event
About This Task
Procedure
- Select
 .The Instrumentation System Overview page appears, displaying a list of Instrumentation System records.
Results
- If the Overall PASS/FAIL result of all the child events is PASS, then the Overall PASS/FAIL of the summary result is set to PASS.
- If the Overall PASS/FAIL result of any of the child events is FAIL, then the Overall PASS/FAIL of the summary result is set to FAIL
Access the Recommended Actions Pane
Procedure
- On the upper-right corner of the page, select
 .The Recommended Actions pane appears, displaying a list of Recommendations linked to the Calibration.Tip: For information about additional options available when working with the Recommendation records, refer to the Action Management section of the documentation.
Access a Calibration Graph
Before You Begin
- Create a Calibration.
About This Task
- Error Graph
- Measure Graph
- Error Trend
- Pass/Fail Trend
This topic describes how to access these graphs.
Procedure
- In the upper-right corner of the workspace, select
 , and then select the type of graph that you want to access. The graph appears.
Change the State of a Calibration
About This Task
Procedure
- In the upper-right corner of the workspace, select the button that indicates the current state of the calibration. For example, if the current state of the calibration is In Progress, select the In Progress button.A drop-down menu appears, displaying a list of operations that you can perform on the analysis to change its state.

What To Do Next
- Propose a recommendation to improvise the calibration strategy.
Create a Recommendation
Procedure
- In the upper-left corner of the pane, select
 .A blank datasheet of the recommendation appears.
 - As needed, enter values in the available fields, and then in the upper-right corner of the datasheet, select .The recommendation is created.Tip: For information about additional options available when working with the Recommendation records, refer to the Action Management section of the documentation.
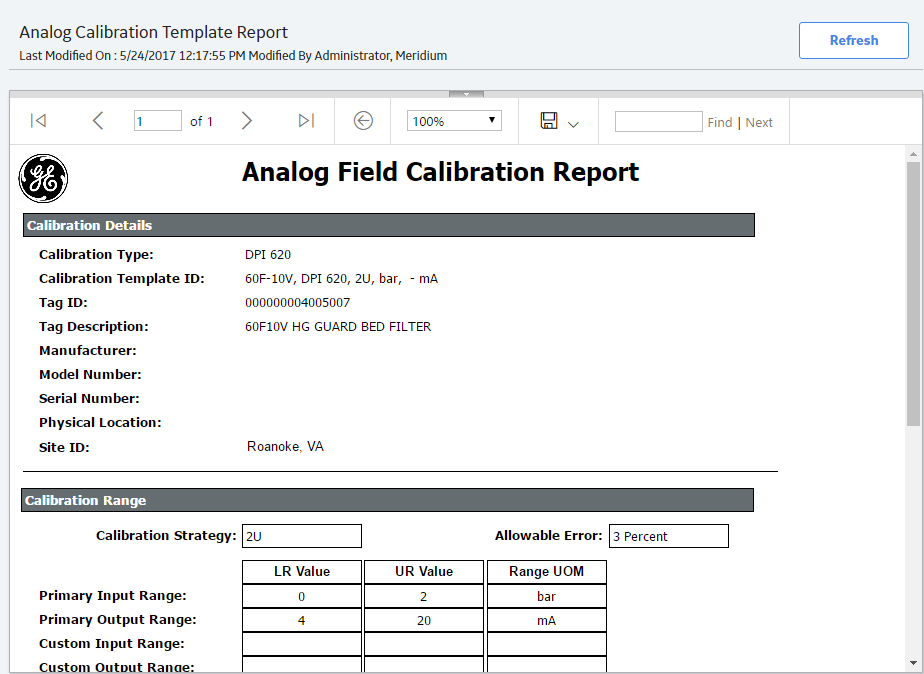
Generate a Calibration Report
Procedure
- In the upper-right corner of the datasheet, select , and then select View Report.
The Calibration report is generated. You can print, save, or export the report or attach the report to an email.
Delete a Calibration
About This Task
- Calibration, Analog
- Calibration, Discrete
- Calibration, Weight Scale
- Calibration, Single Component Analyzer
- Calibration, Multi-component Analyzer
- Calibration, Functional Test
Procedure
- Next to each Calibration that you want to delete, select the check box.Tip: You can also filter and search for the Calibration Task by selecting
 on the upper-right corner of the workspace. The search results appear as you enter values.
 - In the section, select
 .The Delete Calibration Event(s) dialog box appears, asking you to confirm that you want to delete the selected Event(s) and all the links to other records.