
Set Up a Mirror of Mirror
Before you begin
- Install Historian server on each machine that you want to use in the mirror of mirror setup.
- Set up Configuration Hub on each machine that you want to use in the mirror of mirror setup.
- Add a system. The server that you specify while adding the system serves as the primary server for the system.
- Create data stores in the primary server in the public/IT network with the same name as the data stores in the primary server in your organization network.
About this task
Historian is a client and a server application. In the case of a mirror-of-mirror setup, one Historian server functions as a server and the other Historian server functions as a client. The mirror-of-mirror setup enables data exchange between the source Historian and the destination Historian servers. Typically, the Historian server machine listens on port 14000.
The scenarios below are supported:
- Primary Historian mirror and Secondary Historian mirror on the same domain.
- Primary Historian mirror and Secondary Historian mirror on different domains.
- Irrespective of the domain network setup, for the mirror-of-mirror setup to work properly, ensure that your source Historian can communicate with the destination Historian server, and your destination Historian server’s machine is enabled to listen on the port 14000. If the setup is not configured properly, the mirror-of-mirror setup will not work, and the data will go into the source Historian’s mirror-of-mirror store.
- For the Historian Enterprise Mirror Architecture, only "Time based" archives are supported.
Single-Node Setup: The following image shows two networks - OT and IT - with a Historian server installed in each network. These networks communicate using port 14000.
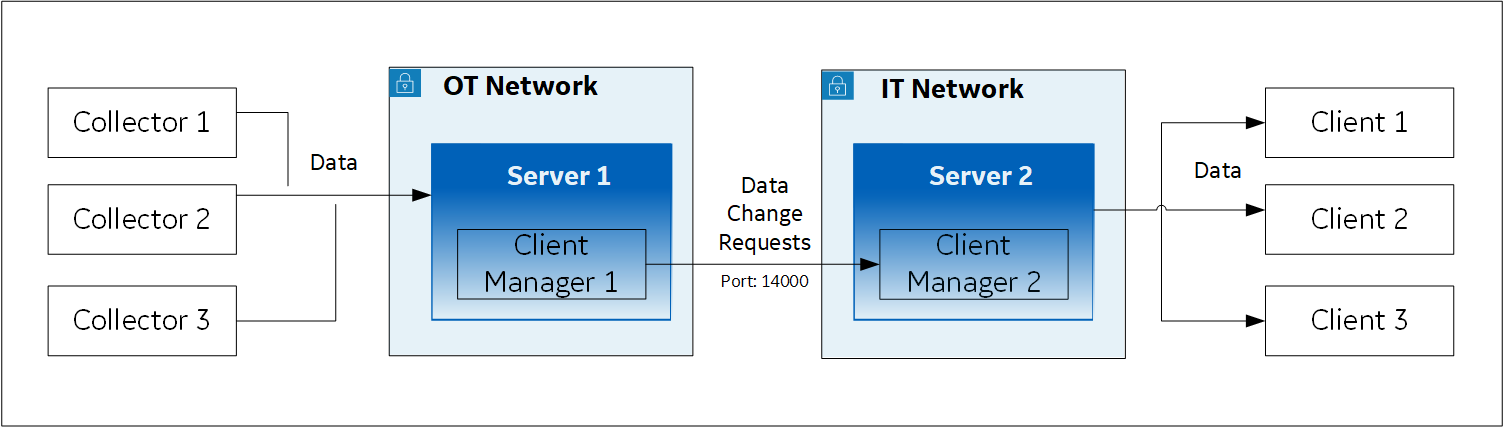
In this setup:
- Server 1 is the primary server in the OT network; it stores data from collectors.
- Server 2 is the primary server in the IT network; it is connected to clients.
- When a tag/data is created, updated, or deleted, Client Manager 1 communicates the same with Client Manager 2 (installed with Server 2 in the IT network).
- The change in the tag/data is replicated in Server 2 (that is, data is created, updated, or deleted accordingly).
- The latest data is retrieved from Server 2 using the clients.
- Mirror 1 includes Mirror Server 1 and Mirror Node 1, which is a backup/standby node for Mirror Server 1; both these machines are in the OT network.
- Mirror 2 includes Mirror Server 2 and Mirror Node 2, which is a backup/standby node for Mirror Server 2; both these machines are in the IT network.

If Mirror Server 1 goes down, Client Manager M1 in Mirror Node 1 communicates with Client Manager 2 in Mirror Server 2.

Similarly, if Mirror Server 2 goes down, Client Manager 1 in Mirror Server 1 communicates with Client Manager M2 in Mirror Node 2.

If both Mirror Server 1 and Mirror Server 2 are down, Client Managers M1 and M2 communicate with each other.

Thus, you can choose to always retrieve data from either Mirror Server 2 or Mirror Node 2. In addition, the store-and-forward functionality is available (in case Client Managers are not yet connected).
- Installing the Historian server on all the machines
- Setting up mirror 1
- Setting up mirror 2
- Setting up a mirror of mirror
Procedure
-
On the machines designated as the mirror primary servers (Mirror Server 1 and Mirror Server 2 in the example), install the Historian server. During the installation, select Historian Mirror Primary Server on the Choose the type of install you want to perform page.

- On the machines designated as mirror nodes (Mirror Node 1 and Mirror Node 2 in the example), install the Historian server. During the installation, select Historian Distributed/Mirror Node on the Choose the type of install you want to perform page.
- On the mirror primary server in your organization's network (Mirror Server 1 in the example), access Configuration Hub.
-
In the NAVIGATION section, under the Configuration Hub plugin for Historian, select Systems.
A list of systems appears in the main section.
-
Expand Mirror Server 1.
A list of servers in the system appears.
-
Select
 .
. The Add Server Machine: <system name> window appears.
 -
Enter the host name or IP address of the mirror node in your organization's network (Mirror Node 1 in the example), and then select Add.
The distributed server is added to the system. A distributed location is added in the server.
-
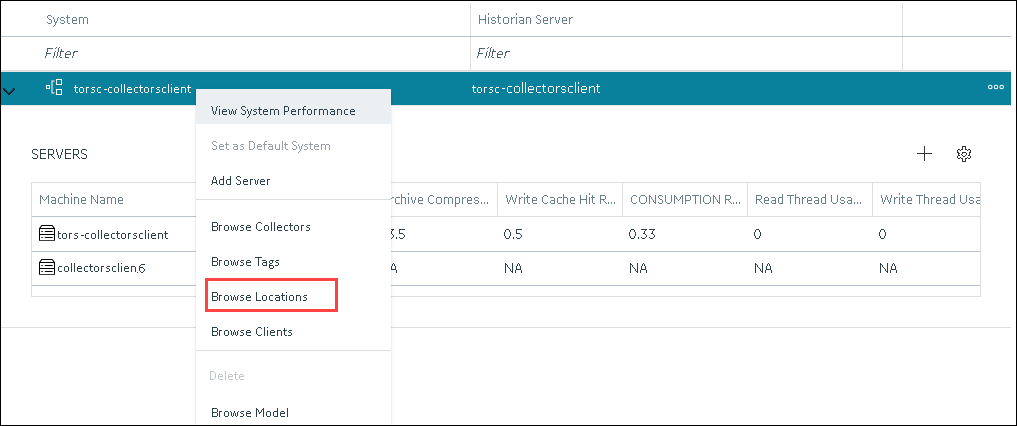
Right-click Mirror Node 1, and then select Browse Locations.
 A list of distributed locations in the system appears.
 -
Select Mirror Locations.
A list of mirror locations in the system appears.
-
In the upper-right corner of the main section, select .
The Add Mirror Location window appears.
-
Provide values as described in the following table.
Field Description MIRROR LOCATION NAME Enter a name for the mirror location. A value is required and must be unique for the system. SERVER MACHINES Select the servers that you want to add to the mirror group (Mirror Server 1 and Mirror Node 1 in this example). This box contains a list of all the servers in the system. You must add minimum two servers to a mirror location. -
Select Add.
Mirror Node 1 is created.
-
Right-click the system name, and then select Add Data Store.
The Add Data Store: Mirror Node 1 window appears.
-
Enter values as described in the following table.
Field Description DATA STORE NAME Enter a unique name for the data store. A value is required. You can use all alphanumeric characters and special characters except / \ * ? < > | You must provide the same name for the mirror setup in the IT network (mirror 2 in the example).
DESCRIPTION Enter a description for the data store. Set as default data store for the system Select this check box if you want to set this data store as the default one. A default data store is the one that is considered if you do not specify a data store while adding a tag. You can set only one data store as default. -
Select Add.
Mirror 1 is configured.
- On the mirror primary server in the IT network (Mirror Server 2 in the example), access Configuration Hub.
-
In the NAVIGATION section, under the Configuration Hub plugin for Historian, select Systems.
A list of systems appears in the main section.
-
Expand Mirror Server 2.
A list of servers in the system appears.
-
Select .
The Add Server Machine: <system name> window appears.
-
Enter the host name or IP address of the mirror node in your organization's network (Mirror Node 2 in the example), and then select Add.
The distributed server is added to the system. A distributed location is added in the server.
-
Right-click the system name, and then select Browse Locations.
A list of distributed locations in the system appears.
-
Select Mirror Locations.
A list of mirror locations in the system appears.
-
In the upper-right corner of the main section, select .
The Add Mirror Location window appears.
-
Provide values as described in the following table.
Field Description MIRROR LOCATION NAME Enter a name for the mirror location. A value is required and must be unique for the system. SERVER MACHINES Select the servers that you want to add to the mirror group (Mirror Server 2 and Mirror Node 2 in this example). This box contains a list of all the servers in the system. You must add minimum two servers to a mirror location. -
Select Add.
Mirror Node 2 is created.
-
Right-click Mirror Node 2, and then select Add Data Store.
The Add Data Store: Mirror Node 2 window appears.
-
Enter values as described in the following table.
Field Description DATA STORE NAME Provide the same name that you provided while setting up mirror 1. DESCRIPTION Enter a description for the data store. Set as default data store for the system Select this check box if you want to set this data store as the default one. A default data store is the one that is considered if you do not specify a data store while adding a tag. You can set only one data store as default. -
Select Add.
Mirror 2 is configured.
- Access Configuration Hub in the primary server in the OT network (Mirror Server 2).
-
In the NAVIGATION section, under the Configuration Hub plugin for Historian, select Systems.
A list of systems appears in the main section.
-
Expand Mirror Server 1.
A list of servers in the system appears.
-
Select .
The Add Server Machine: <system name> window appears.
-
Enter the host name or IP address of the mirror server in the IT network (Mirror Server 2 in the example), select the Set as Mirror of Mirror check box, and then select Add.
The distributed server is added to the system. A distributed location is added in the server.
-
In the NAVIGATION section, under the Configuration Hub plugin for Historian, select Systems.
A list of systems appears in the main section.
-
Expand Mirror Server 1.
A list of servers in the system appears. In the example, Mirror Server 1, Mirror Node 1, and Mirror Server 2 appear.