Installing Historian Components

Important: You do not have the latest version of Historian! You are missing out on the newest capabilities and enhanced security. For information on all the latest features, see the Historian product page. For more information on upgrades, contact your GE Digital sales agent or e-mail GE Digital Sales Support. For the most up-to-date documentation, go here.

Installing Historian Components

After you have installed the Historian server and restarted your system, you can install additional components, such as Client Tools, Excel Add-in, Data Collectors, and Alarms and Events.

Unlike earlier versions of Historian, the Historian Administrator and HDA Server are now installed as part of the Client Tools installation, which means you do not need to run a separate installation for each of those components.

Installing Historian Client Tools

The Historian Client Tools installation installs the following components by default:
  • Historian Client Tools
  • Historian Administrator
  • Historian Documentation and Help
  • OLE DB Driver and Samples
  • HDA Server
  • User API and SDK
  • Historian Client Access Assembly
  • Collector Toolkit
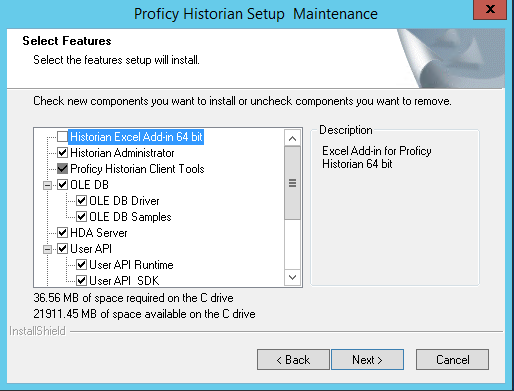
The Historian Excel Add-in 64-bit component is not selected in the Client Tools Select Features screen.


You can select the check box for the Excel Add-in to install it at the same time as the Historian Client Tools. Otherwise, you can install it in a separate installation using the Install Historian 7.1 screen.
Note: You can deselect the check boxes for all the components except the Historian Client Tools and Historian Client Access Assembly. However, if you deselect any of the components to install them at a later time, such as the Historian Administrator or HDA Server, when you re-run the installation, make sure you select all of the previously installed components in addition to the ones that you are installing, because any component that you do not select that was previously installed will be uninstalled during the later installation.
  1. Run the Historian install.
    The Historian Splash screen appears.

    If this screen does not appear, double-click the InstallLauncher.exe file on the ISO or DVD to display it.

  2. Click the Historian Client Tools link.
    The Select Features screen appears with the check box for Historian Client Tools selected.

    By default, the check boxes for Historian Administrator, HDA Server, Historian Documentation & Help, OLE DB, and User API and SDK are also selected. If you do not want to install them at this time, deselect the check box(es) before continuing with the installation process.

  3. Select the Proficy Historian Client Tools check box and click Next.
    The Historian Server Security screen appears.
  4. Select All Users to give all local and domain users full access to the Historian server. Or, select Specific User to add one user with full access to the Historian server.
  5. Click Next.
    The OPC Core Components screen appears briefly, and the installation proceeds.
  6. Click Yes if you want to start the Historian services now, or click No if you want to apply software updates (SIMS) before starting Data Archiver.
  7. Select Yes, I want to restart my computer now, and click Finish.

Installing Historian Data Collectors

Use the Historian install media (.iso disk image file) to install data collectors. Consider the following information as it may applicable to the collector you are installing.
  • All collectors, except the iFIX and Machine Edition View collectors, can run as Windows services. If so configured, they will continue to run after you log out, and can be configured to start automatically when you start your computer.
  • When upgrading a collector(s) from a prior installation, it is recommended that you first uninstall the collector(s) using the media in which the collector(s) was installed, then proceed with the installation of the collector(s) using the new install media.
  • The OSI PI SDK is required for the OSI PI Collector installation; however, the OSI PI SDK does not ship with Historian. If the OSI PI SDK is not installed, the OSI PI Collector will not start. If you install the OSI PI Collector on a machine that does not contain your PI Server, be sure to install the OSI PI SDK on the machine with the OSI PI Collector.
  • If you install the Wonderware Collector on a machine that does not contain your Wonderware server, be sure to install the ODBC Driver for SQL on the Wonderware Collector machine. If the ODBC Driver for SQL is not installed, the Wonderware Collector cannot connect to the Wonderware server.
  • If you plan to select Predix Cloud for your destination server and you are not using Historian Configuration, see Offline Configuration for Collectors
  • If you run the collector install and do not reboot the machine afterwards (as prompted), and then perform a collector uninstall or another collector install, you will likely encounter a failed install or uninstall. To avoid this issue, reboot the machine following the collector install.
  • If you plan to select Predix Cloud for the collector destination, refer to Installing Historian Collectors.

Installing Data Collectors with Historian server/Predix cloud as destination:

  1. Launch the .iso disk image file and run InstallLauncher.exe.
    The Install Historian 7.1 splash screen appears.
  2. Click Install Collectors.
    The Welcome to Historian Collectors! screen appears.
  3. Click Next.
    The License Agreement screen appears.
  4. Click Accept and click Next.
  5. Select an installation drive letter and click Next.
  6. Enter the Data Directory and click Next.
    The Choose the Collector(s) to install screen appears.
  7. Select the Collector(s) that you want to install.
    You can select more than one collectors. In the next screens, the installation configuration is done for each collector that you selected.
  8. Click Next.
  9. If you select Server-only collector(s), for example, File collector, specify the Destination Historian Server name and click Next. You are ready for the install. Or, if you select collector(s) that can be installed on both the Historian server or the Predix cloud, for example, OPC Collector, the wizard screens will guide you through the install process.
  10. Click Next, in the Source Server configuration screen, click Next.
  11. Enter details only if you are configuring a remote OPC server. Click Next.
  12. Depending on the destination of your collector installation, select Historian or Predix Cloud. Note that, the subsequent screens will depend on what you select.
  13. Follow the instructions on the configuration screens that appear to configure parameters for each collector selected for installation.
    When you are done, you may be prompted to start Historian services. If so, click Yes, or click No to apply software updates before starting the Historian services.
  14. Click Exit.
    The Install Historian 7.1 screen appears.
  15. Click Exit.
    You may be prompted to restart your computer to complete the installation. If so, click Yes to restart or No to restart later. The collectors do not appear in the Historian Administrator until after the collectors have been started.

Installing a Collector Silently using the Command Line

Several Historian collectors can be installed silently. A silent install is a method of installing the application software and requires little or no user interaction. This method allows you to perform an unattended installation as it is not necessary for you to direct the installation process. This command line install applies to the following collectors:
  • Server-to-Server
  • OSI PI
  • Wonderware
  • File Collector
  • iFix Collector
  • Calculation Collector
  • iFix Alarm and Event collector
  • OSI Pi Distributor collector
  • OSI S2S Distributor collector

Command-Line Syntax

Command

Collectors_Install.exe

Argument

-s, -silent

Using either of these flags directs the install to progress silently, with no user interaction.

Parameters
  • <CollectorName>_AddLocal (1=install and 0= uninstall)
  • <CollectorName>_sourceservername
  • <CollectorName>_destinationservername
    Note: destinationservername and cloud parameters do not apply to the File Collector, iFIX Collector, or Calculation Collector.

    For a Historian destination, use the machine name. For a Predix Cloud destination, use "Cloud".

  • <CollectorName>_clientsecret
  • <CollectorName>_clouddestaddress
  • <CollectorName>_clouddestaddress
  • <CollectorName>_configserver
    Note: If using offline configuration, set this parameter equal to none. For example:
    HistorianS2SCollector_configserver=none
  • <CollectorName>_identityissuer
  • <CollectorName>_clientid
  • <CollectorName>_zoneid
  • <CollectorName>_proxy
  • <CollectorName>_datapointattributekey1
  • <CollectorName>_datapointattributevalue1
  • <CollectorName>_datapointattributekey2
  • <CollectorName>_datapointattributevalue2
  • <CollectorName>_datapointattributekey3
  • <CollectorName>_datapointattributevalue3
  • <CollectorName>_datapointattributekey4
  • <CollectorName>_datapointattributevalue4
  • <CollectorName>_datapointattributekey5
  • <CollectorName>_datapointattributevalue5

Installing a Collector Silently

Note: Installing a collector can potentially remove a collector that is already installed. For example, if you already installed the OSI PI Collector and then run the silent install for the Server 2 Server Collector, the OSI PI Collector can be uninstalled. If you are installing a new collector on a machine where there is an existing collector that you want to retain, you must use command line parameters for the existing collector as well.
  1. Navigate to the Collectors folder on the install media.
  2. At a command prompt, enter:
    Collectors_Install.exe -s
  3. Add parameters as appropriate and assign the correct values to the parameters using the equal sign (=).
    Be sure to replace <CollectorName> with the name of your collector. For example, you might replace <CollectorName> with HistorianS2SCollector:

    HistorianS2SCollector_AddLocal=1

    If the parameters are not assigned a value, then the default values are used.

1
This command installs the Historian Server 2 Server collector and sets the source server to be PC1 and destination server to be PC2.
>Collectors_Install.exe -s HistorianS2SCollector_AddLocal=1 
HistorianS2SCollector_sourceservername=PC1 HistorianS2SCollector_destinationservername=PC2
2
This command installs the Historian File Collector and sets the destination server name to be PC1.
>Collectors_Install.exe -s HistorianFileCollector_AddLocal=1 
HistorianFileCollector_destinationservername=PC1
3
This command installs the iFIX Collector and sets the destination server name to be PC1.
>Collectors_Install.exe -s HistorianiFIXCollector_AddLocal=1 
HistorianFileCollector_destinationservername=PC1
This command installs the iFIX A&E Collector and sets the destination server name to be PC2.
>Collectors_Install.exe -s HistorianiFixAECollector_AddLocal=1
HistorianiFixAECollector_destinationservername=PC2)
4
This command installs the OSI Pi Distributor collector and sets the source server name to be PC1.
>Collectors_Install.exe -s HistorianPiDistributor_AddLocal=1 
HistorianPiDistributor_sourceservername=PC1
5
This command installs the Historian S2S Distributor collector and sets the destination server name to be PC2.
>Collectors_Install.exe -s HistorianS2SDistributor_AddLocal=1 
HistorianS2SDistributor_HistorianS2SDistributor_destinationservername=PC2
6
This command installs the Windows Performance Collector and sets the destination server name to be PC2.
>Collectors_Install.exe -s HistorianWindowsPerfMonCollector_AddLocal=1 
HistorianWindowsPerfMonCollector_destinationservername=PC2
After your Historian collector silent install, be sure to reboot, otherwise subsequent installs will fail.

Configure OPC Collector Support for Remote OPC Servers

After you have installed the Historian Data Collectors, you can configure OPC Collector support for remote OPC Servers using DCOM.
  1. Enter the remote OPC Server details (machine name or the IP address of the server).
  2. Enter the ProgID. For example, for remote iFIX OPC server, enter Intellution.OPCiFIX.1.


    NOTE: Ensure that the remote OPC server has DCOM configuration enabled.

  3. Optionally, click Add Additional Remote OPC Server.
Configure DCOM settings after the installation is complete.

Searching for a Remote OPC Server ProgID

You can use any OPC client to find the ProgID of the OPC Server. Alternately, you can search from the Registry.

  1. Click Start, enter regedit, and click regedit.exe.
  2. Search for the CLSID of the OPC Server under My Computer\HKEY_CLASSES_ROOT\VendorName.OPC.Name.1.
  3. Use the CLSID value for the ProgID.

Installing the Historian Excel Add-in

You must have Microsoft Excel installed on your computer.
You install the Excel Add-In package as one of the standard installation options from the Historian installation program.

Run the install on the computer on which you want to use the Excel Add-In and select the Excel Add-In option from the list of options to install.

You can also install the Excel Add-In by installing the Client tools on a machine that does not have the Historian Administrator or archive installed.

  1. Run the Historian install.
    The Historian 7.1 splash screen appears.
  2. Click Historian Excel Add-in.
    The installation runs and completes.
    Note: On a 64-bit Windows operating system, the default destination folder for all 32-bit components (such as collectors and APIs) is C:\Program Files\Historian\x86. Similarly, for all 64-bit components (such as Excel Add-in 64-bit and SQL Server 64-bit), they are installed in C:\Program Files\Historian\x64.
  3. If asked to restart your system, click Yes.
    Once the restart is completed, you can activate the Excel Add-in.

Activating the Add-In for Microsoft Excel 2016/2013/2010

  1. Open a new Microsoft Excel 2016/2013/2010 worksheet.
  2. Select File > Options.
    The Excel Options dialog box appears.
  3. Click Add-Ins.
  4. In the Manage drop-down list, click Excel Add-ins and click Go.
    The Add-Ins dialog box appears.


  5. Select Historian Add-In and Proficy_Historian_Helper and click OK.
    The Add-In is now ready to use and the Historian 7.1 menu is now available in the Microsoft Excel toolbar.


    If the Historian Add-In is not listed, click the Browse button to locate the Historian.xla file.

    If you install the Excel Add-In prior to installing Microsoft Excel, the install program copies the Historian.xla file to your Historian folder (typically, C:\Program Files\Proficy\Historian or C:\Program Files (x86)\Proficy\Historian 7.1).

    If you decide to add the Excel Add-In after installing Excel, open Excel and on the Tools menu, select Add-Ins and then from the dialog box that appears, click Browse to locate the Historian.xla file.

    If you uninstall Historian after installing the Excel Add-In as described, ensure that you clear the Historian 7.1 check box in the Microsoft Excel Add-Ins dialog box. If you do not clear this option, you will receive an error each time you open Microsoft Excel.

Activating the Add-In for MS Excel 2007

  1. Open a new MS Excel 2007 worksheet.
  2. Click File > Options.
    The Excel Options dialog box appears.
  3. Click Add-Ins.
  4. In the Manage drop-down list, click Excel Add-ins and click Go.
    The Add-Ins dialog box appears.


  5. Select Historian Add-In and Proficy_Historian_Helper and click OK.
    The Historian Add In menu is now available in the Microsoft Excel toolbar.


Activating the Add-In for MS Excel 2003

  1. Open a new Excel 2003 worksheet.
  2. Select Tools > Add-Ins.
    The Add-Ins dialog box appears.


  3. Select Proficy Historian Add-In and click OK.
    The Add-In is now ready to use and the Historian 7.1 menu is now available in the Microsoft Excel toolbar.

Installing Standalone Help

Historian standalone Help can be installed as one of the components. The following procedure describes how to install Historian standalone Help using the wizard.

  1. Open the Historian ISO.
  2. Click Install Help.
  3. On the Welcome Screen, click Next.
  4. Select the Accept check box to accept the License agreement and Click Next.
  5. Choose an available drive for installing Help. This step is optional. If you do not select any other drive, Help will be installed in C:\ drive.
  6. Click Next.
  7. Input the desired port number for NodeJS server to run (optional). By default it will be installed in port 7070. If the port 7070 is already running other services, the installation cannot proceed further. Select another port for installing the Help.
  8. Click Next.
  9. You are now ready to install. Click Install.
    The installation of standalone Help is complete.
  10. Click Exit.
    Note: You cannot just uninstall the old help and install the new 7.1 help. You can install the new Help by installing the clients of Historian 7.1 - VB Admin, Excel Addin, Web Admin.
    Silent Installing of Historian standalone Help
    1. Load the Historian ISO into the System.
    2. Open Command Prompt and Navigate to the directory where ISO is loaded.
    3. Navigate to the folder Help (present inside ISO file).
    4. Run the command:
      Help_Install.exe -s RootDrive= <Root Drive> PortNumber=<Port Number>
    5. The installation of the Help module will start in Silent Mode.

Installing Alarms and Events

Selecting the Install Alarms and Events option in the Install Historian 7.1 screen installs the Historian Alarm Archiver. You must specify the SQL Server database details for the archiver, as the archiver requires access to SQL Server.
Important:
  • If you have the Alarms and Events component installed on a pre-7.0 version of Historian, then after you upgrade to Historian Server 7.0, you must install the Alarms and Events component separately.
  • The Alarms and Events component must be installed on the same machine as the Data Archiver.
  • When upgrading from 4.5 to 7.0 Alarms and Events, since the DB Schema for 4.5 is different, if you select the same database name that is pre-populated by default, you will get an error message: Later or Higher version of Alarms and Events database is already installed. Hence, you cannot proceed further. You need to enter a different database name and then proceed with the upgrade.

To install Alarms and Events:

  1. Run the Historian install.
    The Historian 7.1 splash screen appears. If this screen does not automatically appear, double-click the InstallLauncher.exe file on the ISO or DVD to display it.
  2. Click Install Alarms and Events.
    The Alarm and Event Archiver screen appears. The Server Name and Database Name fields might be auto-populated with default values.
  3. To change either of these fields, type a different entry in the respective text box.
    The Server Name is where SQL Server is installed and the Database Name is for the database where the alarms and events are archived.
  4. Select the box for Use SQL path as data and log path and enter the SQL Server login credentials in the Admin User and Password fields.
    If you choose to use Windows Authentication, select the box for Use Windows Authentication and enter your Windows admin credentials in the Admin User and Password fields.
  5. Click Next.
    It may take several minutes for the installation to complete.
  6. If asked to restart your system, click Yes.
  7. To verify that the Alarms service has started, go to the Services window and look for the Historian Alarm Archiver.
    Startup Type is Automatic, meaning it is started automatically when the system is started or restarted.

    Historian's Alarm and Event (A&E) archiving offers the ability to collect A&E data from any OPC-compliant A&E server and store it in an integrated relational database. Historian Alarm and Event data is associated with the related process data from its source to allow for quick analysis.

    For more information, refer to Historian Alarms and Events.

Using a Remote SQL Server to Store Alarms

If you have chosen to connect Historian to a remote SQL Server, you must ensure the following conditions are met:
  • The Historian Alarm Archiver service must be run on a user account that has privileges to log into the SQL Server using Windows Authentication.
  • The Default Backup Path, found on the Archive screen, must be a shared directory that is accessible to both the Historian Data Archiver and the remote SQL Server. It is recommended that this shared directory be placed on the same computer as the Historian Data Archiver service.

Installing the Historian Administrator

You must run the Client Tools install before installing the Historian Administrator. In addition, during the Client Tools installation, Historian Administrator is selected by default and is installed along with the Client Tools. If you want to install the Historian Administrator at a later time, deselect the check box before continuing with the Client Tools installation.

You can install a Historian Administrator on any node that connects to the Server through a Historian API.

  1. Run the Historian install.
    The Historian Splash screen appears.

    If this screen does not appear, double-click the InstallLauncher.exe file on the ISO or DVD to display it.

  2. Click the Install Client Tools link.
    The Select Features screen appears.
  3. Click Run.
    The Welcome screen appears.
  4. When the Install Wizard appears, select the Historian Administrator option in addition to any previously installed Historian components, and then click Next.
    The program installs the Historian Administrator and any other components associated with it, including the API. If you prefer, you can install the Historian Administrator at the same time you install other options, by selecting all desired options at once.
    Note: If you intend to run all components (Historian Server, Collectors, and Client tools) on a single computer, choose Install Historian 7.1 on the splash screen and proceed with the installation wizard.

Starting the Historian Non-Web Administrator

To start the Historian Non-Web Administrator, you must be a valid Windows user on the Historian Server. A screen resolution of 1024 x 768 or above is recommended for Historian Non-Web Administrators.
  1. From the Start Menu, select Programs>Historian <version>.
  2. Select Historian Administrator to open the application.
    The system attempts to connect to the default server using the current logged in user and password. The Historian System Statistics screen appears.
    Tip: As an alternative, you can create a shortcut and start Historian Administrator from a desktop icon.
  3. To specify another user name, or to switch servers:
    1. Click on the Main link.
      The Login dialog box appears.
    2. Select a server from the drop-down list or click the Browse button to browse for a server.
    3. Enter your user name, password, and domain, if any, and then click OK.
      The Historian System Statistics screen appears. You can now proceed with all Historian Administrator functions.

Installing the Historian HDA Server

Both the Historian Administrator and Historian HDA Server are installed by default when you install the Client Tools. It is recommended that you keep the default selections when you are installing Client Tools, because if you deselect them during the initial Client Tools installation, and then go back to install them, any check box that you deselect during the second install will uninstall the deselected component.
Note: If you choose to install the HDA server at a later time, make sure that Historian Administrator is installed before you install the HDA server, or select them together in the Select Features screen.

You can install the Historian OPC HDA Server on any server on which the Historian Server has been installed.

  1. Run the Historian install.
    The Historian Splash screen appears.

    If this screen does not appear, double-click the InstallLauncher.exe file on the ISO or DVD to display it.

  2. Click the Historian Client Tools link.
    The Select Features screen appears.
  3. Select HDA Server and click Next.
  4. Click Run.
    The Welcome screen appears.
  5. Click Next.
    The License Agreement screen appears.
  6. Click Yes.
    The Select Features screen appears.
  7. Select the component (HDA Server) that you want to install, and click Next.
    The Choose the Program Folder screen appears.
  8. Accept the default destination folder or browse for a new location, and click Next.
    The Historian Server Name screen appears.
    Note: On a 64-bit Windows operating system, the default destination folder for all 32-bit components (such as collectors and APIs) is C:\Program Files\Historian\x86. Similarly, for all 64-bit components (such as Excel Add-in 64-bit and SQL Server 64-bit), they are installed in C:\Program Files\Historian\x64.

    NOTE: When the HDA Server option is selected, then the Historian install wizard will install Microsoft .NET Framework 4.5 and the OPC Core Components 3.00 redistributable during the installation process.

  9. Enter the Historian Server name and click Next.
  10. Read the Configuration Review screen and click Next.
  11. Select Yes, I want to restart my computer now, and click Finish to complete the installation.

Installing Historian SDK

If you need to create customized programming for the Historian Server, use the Historian Software Development Kit (SDK) with Visual Basic or any application that provides a VBA programming interface, such as iFIX, Microsoft Excel or Microsoft Word. The Install Wizard places the Historian SDK in the System32 directory and automatically registers it. To use the SDK, set up a project reference with the Historian SDK.

Installing the Historian Client Access API

The Historian Client Access API is a .NET assembly that interacts with Historian from any .NET applications. It is installed automatically when the Historian Client Tools are installed.
For Microsoft .NET-based application development, use the Historian Client Access API with C#, VB .NET, or any .NET compliant application. By default, the Install Wizard places both the API and Client Access .dlls in GAC (Global Assembly Cache). If you want to reference it to any client application, you can refer the following file path: INSTALLPATH\Assembly\Historian.ClientAccess.API.dll.
Important: It is recommended that you add Historian Client Access API references from the INSTALLPATH directory since global assembly cache is part of the run-time environment.