Implementing Historian Security

Important: You do not have the latest version of Historian! You are missing out on the newest capabilities and enhanced security. For information on all the latest features, see the Historian product page. For more information on upgrades, contact your GE Digital sales agent or e-mail GE Digital Sales Support. For the most up-to-date documentation, go here.

Implementing Historian Security

Historian is a high performance data archiving system designed to collect, store, and retrieve time-based information efficiently. By default, access to these Historian archives, tags, and data files is available to any valid operating system user account. In this default environment, all users are allowed to read, write, change, and delete archives, tags, or data files in the Historian Administrator, SDK, Migration Tools, and Excel Add-In. However, you may find that you want to make these functions and data available only to authorized personnel. You can do this by creating and defining Historian Security Groups in your Windows Security.

Historian includes an Electronic Signature and Electronic Records security feature. This option provides installations concerned with the FDA's 21 CFR Part 11 regulation or any site interested in added security or tracking the ability to require a signature and password every time a change in data or configuration is requested. For more information on the Electronic Signature and Electronic Records feature, refer to the Using Historian in a Regulated Environment section of the Using the Historian Administrator manual.

To ensure a secure environment when using Historian security, do not create any local user accounts unless Historian is set up on a standalone machine.

Whether or not you use Historian security, make sure that you disable Guest accounts on your computer to limit access to valid Windows user accounts.

There are two ways in which the UAA commands can be executed. You can select one of the two for adding users and clients to the UAA server:

About Protecting Your Process

If you want to restrict access to Historian archives, files, and tags, or protect your data files from unauthorized changes, you can enable Historian security. Using security is optional and is disabled by default. By enabling security, you can restrict access to the following:
  • Modifying data using the Excel Add-In
  • Updating security for individual tags or groups of tags
  • Creating, modifying, and removing tags
  • Tag protection (adding, modifying, removing, and so on) can be applied at a global level to all tags or at the individual tag level.

    Refer to Implementing Tag Level Security for more information.

  • Reading data in the iFIX Chart object, Excel Add-In, and Migration Utilities
  • Writing data
  • Starting and stopping collectors
  • Creating and deleting collectors
  • Creating, modifying, and deleting archives

Historian uses the operating system security groups to create a security structure. You enable security for a particular set of functions by adding specific Historian Security Groups to your groups. You can also add security groups to your domain controller. Refer to the Security Tab section in the Historian Administrator Manual for information on selecting local or domain security groups.

By defining one or all of the groups, you begin to set up a security structure. Refer to the Historian Security Groups section for more information on the Historian Security Groups available.

Strict Authentication

With Historian's strict user account authentication features, Enforce Strict Client Authentication and Enforce Strict Collector Authentication, you can control access to the Historian server and safeguard user account credentials.

With strict authentication enabled, only known user accounts configured on the Data Archiver server computer will be able to access a Historian server. Similarly, enabling strict collector authentication enforces the same requirement for incoming collector connections.

For an account to be known at the Data Archiver, it has to exist on that archiver as a local account or exist on a Domain Controller available to the data archiver. Historian will access the local accounts or Domain Controller via Microsofts Security Support Provider Interface (SSPI) and this involves having a Kerberos server setup optionally to assist in account validation.

By default, strict client and collector authentication is enabled on new installations to maximize security. When upgrading from a previous version of Historian, strict client and collector authentication is disabled to allow compatibility with older clients or collectors that cannot be upgraded concurrently.

It is recommended that all clients and collectors receive timely upgrade to the latest version, which permits enabling both strict client and collector authentication on the server for the highest security configuration.

By treating clients and collectors separately, it is possible to accommodate new and legacy authentication during the upgrade process. However, upgrading all clients and collectors to the latest version immediately will achieve a high level of security. The two options, Enforce Strict Client Authentication and Enforce Strict Collector Authentication, permit flexibility during the upgrade process by selectively accommodating legacy clients and collectors.

Strict Authentication Options

This table provides guidelines about the different combinations of strict client and collector authentication options and their use:

Strict Client Authentication Strict Collector Authentication Comment
Enabled Enabled Use this for highest available security. You will need to install SIMs, if available on all pre-6.0 collectors and clients. Clients can refer to any program that connects to the Data Archiver. This includes Historian Administrator, Microsoft Excel, any OLEDB program, user written programs, or any other Proficy software.
Enabled Disabled Use this if you are unable to upgrade collectors to the latest version if there is no SIM update for your collector.
Disabled Enabled Use this if you have to support legacy clients and you are unable to install the SIM update on all clients.
Disabled Disabled Use this for maximum compatibility with existing systems.

For more information, refer to the product IPI (Important Product Information) ebook or SIM release notes.

Disabling Strict Client and Collector Authentication

To permit older versions of clients and collectors to access a Historian 7.0 (or later) server, disable strict client and collector authentication.

  1. Open the screen and click the DataStore MaintenanceSecurity tab.
  2. In the Global Security section:
    • Select the Disabled option button for Enforce Strict Client Authentication.
    • Select the Disabled option button for Enforce Strict Collector Authentication.

Trusted Connections in Distributed Historian Service Environment

This trusted connection works only in the Domain environment and it is enabled by default.
Note: If you are adding a mirror copy to an existing node, make sure that both the nodes are in the same domain.

If you want to work in the workgroup setup, contact Online technical support & GlobalCare:www.digitalsupport.ge.com.

Security Strategy Guidelines

When you begin to implement security, you should first define a clear strategy. Consider the following when beginning to set up your security strategy:
  • If you disabled the Guest account, a user must provide a valid username and password even if no groups are created.
  • Protection is only provided for the functional areas for which you have built the associated Historian Security Groups.
  • If you only choose to define some of the security groups, all users still have all access to any uncreated groups. All users are still assumed to be a member of a group unless that group has been created, with the exception of iH Audited Writers group. You must add the iH Audited Writers group to the Windows security groups so that a user can become a member of this group.

    For example, if you elect to define the iH Security Admins group and iH Archive Admins group, both the members associated with those defined groups and all other valid users still have access to such functions as creating and modifying tags until you create the iH Tag Admins security group.

  • If you implement any Historian Security groups, you must first add and define the iH Security Admins group.
Note: If you do not create and define the iH Security Admins group, all valid users are assumed to be members of this group. This membership overrides any other security group that you set.

See also Historian Security Groups.

Setting Historian Login Security

Use Historian Login Security settings if you want to validate users at the Data Archiver, instead of at the client. By applying these settings, users and applications are forced to provide a user name and password at connect time so that the archiver can validate them. For example, users in the security group such as ih Security Admins will be checked by the Archiver.

For Historian Login Security settings, you can view and set the property from the HistorianSDKsample server properties. The current setting is shown in the data archiver SHW file.

Historian Login Security property is available only in Historian SDK.

To set login security using the Historian SDK:

  1. Run the SDK sample.
  2. Connect to a server.
  3. Select the server in the list box.
    The Server Properties dialog box appears.
  4. On the right side of the dialog box, locate the AllowClientValidation setting. By default, this value is set to TRUE. Click to set to FALSE, and click OK.

Historian Security Groups

Historian provides the following security groups:
iH Security Admins
Historian power security users. Security Administrators have rights to all Historian functions. This group also has the ability to change tag level security, archive security, and modify the Electronic Records and Signatures option. This is the only Historian security group that overrides tag level security.
iH Collector Admins
Allowed to start and stop collectors, browse collectors, configure collectors, and add new collectors.
iH Tag Admins
Allowed to create, modify, and remove tags. Tag level security can override rights given to other Historian security groups. Tag Admins can also browse collectors.

iH Tag Admins are not responsible for setting Tag Level Security. This task can only be performed by an iH Security Admins. For more information on setting Tag Level Security, refer to the Implementing Tag Level Security section.

iH Archive Admins
Allowed to create, modify, remove, backup, and restore archives.
iH UnAudited Writers
Allowed to write data without creating any messages.
iH UnAudited Logins

Allowed to connect the DataArchiver without creating login successful audit messages.

iH Audited Writers
Allowed to write data and to produce a message each time a data value is added or changed.

Tag, archive, and collector changes log messages regardless of whether the user is a member of the iH Audited Writers Group.

iH Readers
Allowed to read data and system statistics. Also allowed access to Historian Administrator.

Historian Security Group Rights

Use this table to identify the types of user groups you need to create and define in your security system.
Function iH Security Admins iH UnAudited Writers iH UnAudited Login iH Audited Writers iH Readers iH Archive Admins iH Tag Admins iH Collector Admins
Create Tags:
  • Excel Add-In
  • SDK
  • Historian Admins
  • File Collector
X X
Remove Tags:
  • Historian Admins
  • SDK
X X
Modify Tags:
  • Historian Admins
  • Excel Add-In
  • SDK
  • File Collector
X X
Modify Archive Security:
  • Historian Admins
  • SDK
X
Backup Archive:
  • Historian Admins
  • SDK
X X
Restore Backup:
  • Historian Admins
  • SDK
X X
Create Archive:
  • Historian Admins
  • SDK
X X
Start/Stop Collector:
  • Historian Admins
  • SDK
  • Mission Control (iFIX)
X X
Browse Collector:
  • Historian Admins
X X
Read Data:
  • Chart Object
  • Excel Add-In
  • SDK
X X
Write Data (UnAudited):
  • Excel Add-In
  • SDK
X X

X

Write Data (Audited):
  • Excel Add-In
  • SDK
X X
Modify Data:
  • Excel Add-In
  • SDK
X X X X
Update Security for Tag:
  • Excel Add-In
  • SDK
  • Historian Admins
X
Migrate
  • Migration Tools
X
Login Connection Messages X X X X X X X

Security Setup Example

The following example takes you through the process of establishing your security needs and defining and setting up the levels of security.

For this example, assume the following user needs in a plant of 14 users:
User Needs Added to Security Group
USER1 Power user. Needs total access to security. iH Security Admins

USER2

USER3

USER5

USER6

USER8

  • Read/Write Data (no messages).
  • Create, modify, and delete tags.
  • Backup, restore, and create archives.
  • Connect to Data Archiver without creating login successful audit messages
  • iH UnAudited Writers
  • iH Tag Admins
  • iH Archive Admins
  • iH UnAudited Logins

USER4

USER7

  • iRead/Write Data (no messages).
  • iCreate, modify, and delete tags.
  • iStart/Stop Collectors.
  • iBackup, restore, and create archives.
  • iH UnAudited Writers
  • iH Tag Admins
  • iH Collector Admins
  • iH Archive Admins
USER9-14 Read Data. iH Readers
  1. Establish the needs of your users. For this example, assume the user needs in a plant of 14 users, as described in the previous table.
  2. Add and define the iH Security Admins Group.
    Once you determine that you want to establish a security structure, you must create and define the iH Security Admins group. This group of users is typically the "power users" of the Historian. Security Administrator rights allow them to manage configuration and give them free rein to the entire system. For this example, only USER1 would be added to the iH Security Admins group.
  3. Establish and create any other Historian Security Groups as needed.
    Note: Any user with Windows administrative permissions can add or remove Windows groups and users. As such, an administrator on a Windows computer, can add himself to any Historian security group.

    Set up the functional security groups as needed. For this example, Write, Tag, Archive, and Collector security is required, so the groups associated with those functions should be added and defined. There is no need for Audited Writers and all valid users can read data, so neither the iH Audited Writers Group nor the iH Readers Group need to be added.

  4. Define any individual Tag Level security.

    In addition to defining iH Tag Admins that have the power to create, modify, and remove tags, you can also define individual tag level security to restrict access to sensitive tags. You can grant read, write, or administrative privileges per tag. For more information on setting Tag Level security, refer to the Implementing Tag Level Security section.

Setting Up Historian Security Groups

This section describes how to add the Historian Security Groups to your local and domain Windows security systems.
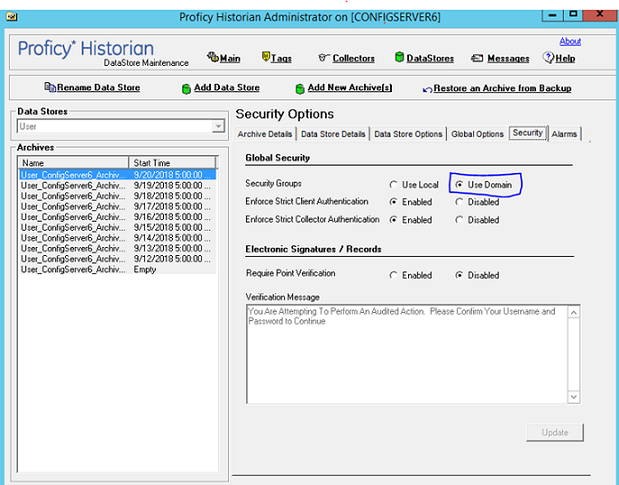
You can choose whether Historian uses LOCAL or DOMAIN security by selecting an option on the Security tab of the Data Store Maintenance screen in the Historian Administrator. If you select the local security option, the groups are defined as local groups on the Historian server. If you select the Domain security option, the groups are defined as global groups in the primary domain controller of the Historian server. With domain security, Historian locates the Primary Domain Controller (PDC), if available, or a Backup Domain Controller (BDC) in order to establish groups. If the PDC and all BDCs are unavailable, the system locks all users out until rights can be established with a valid PDC or BDC.
Note: If you change this setting, you must stop and re-start the Historian server for this change to take effect.

Creating a Local Group on Windows

This procedure applies to Windows 7, Windows 8.1, Windows 10, Windows Server 2008 R2, or Windows 2012 R2.

To create a new local group:

  1. Open the Control Panel.
  2. Double-click the Administrative Tools.
  3. Double-click the Computer Management icon.
    The Computer Management console opens.
  4. Select Groups from the Local Users and Groups folder in the system tree.
  5. From the Action menu, select New Group.
    The New Group dialog box appears.
  6. Enter the Historian Security Group name in the Group Name field.
    For a list of available Historian Security Groups and their functions, see Historian Security Groups.
    Note: You must enter the Historian Security Group name exactly as it appears. The security groups are case sensitive.
  7. Optionally, enter a description of the Historian Security Group in the Description field.
  8. Click Create.
  9. Click Close.

Adding Users to Windows Security Group

This procedure applies to Windows 7, Windows 8.1, Windows 10, Windows Server 2008 R2, or Windows 2012 R2.

Before adding users to your group, you must first add your users to the Windows system.

To add a user to a group:

  1. Open the Control Panel.
  2. Double-click the Administrative Tools.
  3. Double-click the Computer Management icon.
    The Computer Management console opens.
  4. Select Groups from the Local Users and Groups folder in the system tree.
  5. Select the group to which you want to add users.
  6. From the Action menu, select Properties.
    The Users Properties dialog box appears.
  7. Click Add.
  8. Select the users or groups to add from the listed users or enter the names of the users or groups you want to add in the bottom field.
  9. Click Add.
    Note: To validate the user or group names that you are adding, click Check Names.
  10. When you have added all users to the group, click OK.

Adding a Local User

  1. Verify object type is Users or Groups.
  2. Verify the From This Location setting is your local machine. (Click Locations to specify the local machine, if required.)
  3. Click Advanced.
    The Advanced dialog box appears.
  4. Click Find Now.
  5. From the list of users, select the users or groups to add or enter the names of the users or groups you want to add in the bottom field.
  6. In the Advanced dialog box, click OK.
  7. In the Select Users dialog box, click OK.
  8. In the Group Properties dialog box, click OK.

Adding a Domain User

  1. Verify object type is Users or Groups.
  2. Verify the From This Location setting is your Windows domain:
    1. Click Locations to specify the domain, if required.
    2. Select Entire Directory or the specific domain underneath Entire Directory.
    3. Click OK.
  3. Click Advanced.
    The Advanced dialog box appears.
  4. Click Find Now.
  5. From the list of users, select the users or groups to add or enter the names of the users or groups you want to add in the bottom field.
  6. In the Advanced dialog box, click OK.
  7. In the Select Users dialog box, click OK.
  8. In the Group Properties dialog box, click OK.

Active Directory Setup - an Overview

Historian Active Directory setup supports integration with complex models that include the following complexities:

  • Users and administrators may belong to different domains within a forest.
  • Domains may have sub-domains (multi-level) that need to inherit or refine on inherited permissions
  • Group names may be longer than average to cater for group differentiation

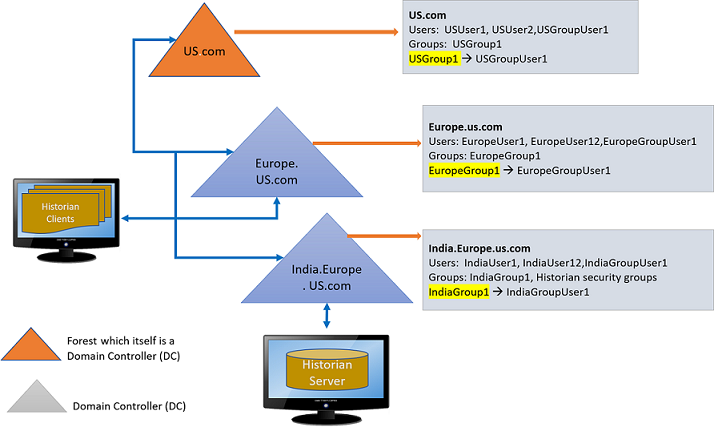
The Active Directory setup supports authentication and authorization of users as members of groups from trusted or sub-domains (including assigning appropriate Historian access rights in line with Historian security roles/groups access).

The following figure provides an overview of the Active Directory setup with eamples:


Configuring the Domain Users for active directory setup

To configure the domain (single\multi) environment in the Historian Administrator:

Historian Security Groups should be created on the machine where the Domain controller of the Historian Server is installed. In the example illustrated above, the India.Europe.US.com domain controllers must contains the following Historian groups
  • IH Security Admins
  • IH Collector Admins
  • IH Tag Admins
  • IH Archive Admins
  • IH UnAudited Writers
  • IH UnAudited Logins
  • IH Readers
  • IH Audited Writers
    Note: Historian Security Groups should be of type Domain-Local only.
  1. On the Data Stores > Security tab > Global Security, select the Use domain option.


  2. Stop the Historian Services.
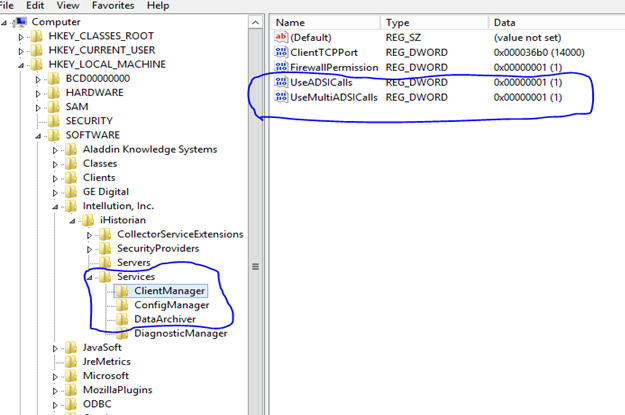
  3. Add the Registry Entries for ClientManager, ConfigManager and DataArchiver as shown below.
    Registry path: \HKEY_LOCAL_MACHINE\SOFTWARE\Intellution, Inc.\iHistorian\Services\


  4. Start the Historian Services. The new registry entries will now be read by the corresponding Historian service.

Accessing Historian Server using Domain Users - Examples

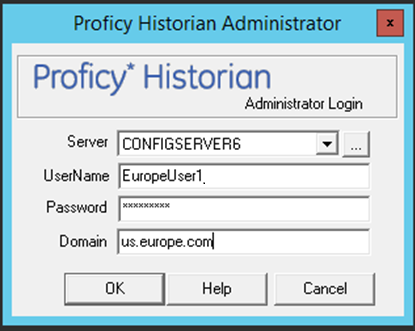
Example 1: European domain user trying to connect to Historian Server installed in India.Europe.US.com Domain Controller (DC).

  1. Create a user EuropeUser1 in Europe.US.com DC.
  2. Add the user (i.e. EuropeUser1) from Europe.US.com to IH Security Admingroup in India.Europe.US.com DC
  3. Log in to Historian Client using EuropeUser1 as shown below.


  4. EuropeUser1 is added to IH Security Admin. The user will get full access to Historian Server.

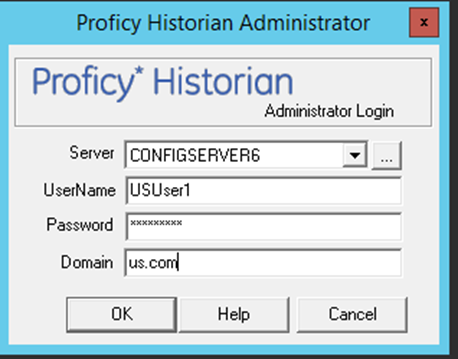
    Example 2: US domain user trying to connect to Historian Server (which is installed in India.Europe.US.com Domain Controller (DC).

    1. Create a user USUser1 in US.com DC.
    2. Add the user (i.e. USUser1) from US.com to IH Readersgroup in India.Europe.US.com DC
    3. Login to Historian Client using USUser1 as shown below.


  5. USUser1 is added to IH Readers. The user will get only data read access to Historian Server.

Adding Nested Domain Groups to Historian Security Groups

The following procedure describes, a European domain group user trying to connect to Historian server, installed in India.Europe.US.com Domain Controller.

  1. Create a user EuropeGroupUser1 in Europe.US.com DC.
  2. Create a group EuropeGroup1.
  3. Add the EuropGroupUser1 to EuropeGroup1.
  4. Add the group (i.e. EuropeGroup1) from Europe.US.com to IH Security Admingroup in India.Europe.US.com DC
  5. Login to Historian Client using EuropeGroupUser1.
  6. If a new user gets added to EuropeGroup1 then it gets automatically synced with Historian Security Groups.
    Note:
    • As EuropeGroupUser1 added as a IH Security Admin, user will get full access to Historian Server.
    • When there is a change to EuropeGroup1 (Add/Delete/Modify users), it gets automatically synchronized with Historian Security Groups. The synchronization time is configurable using Data Archiver options as shown below:

      ihDataArchiver_x64 ihArchiverMultiADSISyncInterval <Number of hours>

      Default is 6hours and user can configure between1 to 120 hours.

    US domain group user trying to connect to Historian Server installed in India.Europe.US.com Domain Controller.

    1. Create a user USGroupUser1 in US.com DC (if not exist).
    2. Create a group USGroup1.
    3. Add the USGroupUser1 to USGroup1.
    4. Add the group (i.e. USGroup1) from US.com to IH Security Admingroup in India.Europe.US.com DC
    5. Login to Historian Client using USGroupUser1.
    6. If a new user gets added to USGroup1 then it gets automatically synced with Historian Security Groups.
    Note:
    • As USGroupUser1 added a IH Readers, user will get data read access to Historian Server
    • When there is a change to USGroup1 (Add/Delete/Modify users), it gets automatically synchronized with Historian Security Groups. The synchronization time is configurable using Data Archiver options as shown below:

      ihDataArchiver_x64 ihArchiverMultiADSISyncInterval <Number of hours>

      Default is 6hours and user can configure between1 to 120 hours.

Using the UAA Config Tool

Use the UAA Config tool to perform the following tasks:
  • Add a local UAA user.

    Here a local UAA user means a user defined by UAA, not by an external identity provider such as LDAP.

  • Remove a local UAA user.
  • Reset the password for a local UAA user.
  • Add a local UAA user to an existing UAA group.

    Since OAuth2 scopes are implemented as UAA groups, this means the same as adding a scope to a user.

  • Remove a local UAA user from an existing UAA group.

A user who performs these functions is acting as the adminclient and needs to know the secret of the admin client. The tool does provide a way for the user to cache the secret safely to be used later.

The tool is installed in the UAA subdirectory of the Historian installation directory, typically C:\Program Files\GE Digital\UAA. Run the tool from a Windows command prompt window.

Syntax

The tools syntax follows this format:

uaa_config_tool verb [options]
where verb is one fo the following:
  • add_user
  • remove_user
  • set_user_password
  • add_user_to_group
  • remove_user_from_group
  • clear_secret

Run the tool without a verb or any other options to view the help screen.

Options can be specified in the form of single dash followed by a short name, or double dash followed by a long name, followed by the value of the option, if any. For example, you can specify the user name Alice by either

-u Alice

or

--UserName Alice

Options

The options are as follows:
Short name Long name Remark
-t --Target URL of the UAA instance that the command should be performed on. Typically, the URL is https://localhost:8443/uaa, which is the default value. This option is optional and is only needed when the user wants to run the command against a remote UAA instance (which is not recommended due to security concerns).
-n --ClientId ID of the client that the user is acting as. By default, it is admin. This option is optional and is only needed when the admin has set up the UAA to delegate certain operations to others.
-s --ClientSecret This is the secret used to authenticate the user for acting as the admin client (or an alternative client given in a --ClientId option). If the user has elected to cache the secret previously, then this option can be omitted. Otherwise, it has to be provided.
-c --CacheSecret This option is not followed by a value and is optional. If specified, the tool will cache the client secret so when the next time this tool is invoked the secret does not have to be specified. Note that the secret is encrypted and only the current Windows logon user can access and decrypt.
-u --UserName Name of the user that the tool is being invoked for. For example, the user that is being added or removed.
-p --UserPassword The password for the user being added or whose password is being reset. The option is only needed for the add_user and set_user_password commands.
-g --Group Name of the UAA group (scope) that the user is being added to or removed from. The option is only needed for the add_user_to_group and remove_user_from_group commands.

Examples

  • To add a new user named bob with the password bobcat2 (with the admin client secret MyNotSoSecret specified on the command line, to be cached and used later):
    uaa_config_tool add_user -u bob -p bobcat2 -s MyNotSoSecret -c
  • To add user bob to the group historian_visualization.user, using the previously cached admin secret:
    uaa_config_tool add_user_to_group -u bob -g historian_visualization.user
  • To remove user alice from a remote instance of UAA as an alternative client (that is, other than admin) useradmin:
    uaa_config_tool remove_user -u alice -t https://webhost.lab:8443/uaa -n useradmin -s MyOtherNonSecret
  • To clear any cached client secret:
    uaa_config_tool clear_secret
    Note: If the Windows logon account is not shared, it is not necessary to clear cached secret, since the cache is encrypted and only the same Windows user account can decrypt.

Adding a UAA User

These instructions are for adding users and clients to the UAA server after a non-domain or non-LDAP Historian installation. You must have Internet access on the machine on which you are performing these steps.

  1. Download the Ruby installer and devkit from http://rubyinstaller.org/downloads/.
  2. Run the Ruby installer.
  3. Copy the devkit to the Ruby directory and extract the files.
  4. Open the Start command prompt with Ruby and change the directory to the Ruby install location.
    cd C:\Ruby22
  5. Enter the following commands:
    >Ruby dk.rb init
    
    >Ruby dk.rb install
    
    >gem install cf-uaac
    If your network has a proxy, you may need to add --http-proxy.<yourproxy> to the command line. For example
    >gem install cf-uaac --http-proxy.<yourproxy> 
  6. Enter the following commands:
    >uaac target http://<servername>:8080/uaa
    
    >uaac token client get admin 
    
  7. Enter the following command to see all the uaac commands you can use to add, edit, and remove a client or user.
    >uaac help

    The user is the actual person, while the client is the application.

  8. Add a user:
    >uaac user add <username> --emails "email"

    You are prompted to add the password for the user. This will add the user you want; you can edit it later for scope.

  9. Add scopes to the newly created user:
    >uaac member add historian_visualization.admin <username>
    >uaac member add historian_visualization.user <username>
    >uaac member add historian_rest_api.read <username>
    >uaac member add historian_rest_api.write <username>
    

About Domain Security Groups

When you configure Historian to use Domain security groups, the Data Archiver attempts to locate the groups on the Primary Domain Controller (PDC) or one of the Backup Domain Controllers (BDC). If you don't have a primary domain controller or if it is slow to access, you can have the Data Archiver access the nearest domain controller via the UseADSICalls registry key. When using a PDC, if a Primary or Backup Domain Controller cannot be located when the Historian Data Archiver service starts, access to Historian is denied to all users.

For troubleshooting, the data archiver show (.SHW) file lists all PDCs and BDCs available at the time of archiver startup. Use this list to verify that the Historian Server has visibility into the appropriate domain.

When using a PDC, after the list of Domain Controllers has been established, the Historian Server will use that list to query for Security Group Membership on an as needed basis. If at any time a request for Group Membership information is made and the Primary Domain Controller is not available, Historian selects the first Backup Domain Controller and attempts the same request. If a Backup Domain Controller successfully responds to the request, the process of querying for Group Membership can stop. Otherwise, Historian will attempt to query Group Membership information from the next available Backup Domain Controller. If no Backup Domain Controller successfully responds, access to the system is denied.

When using the UseADSICalls registry key, Historian does not connect to a specific domain controller and lets the operating system contact the most available one.

Changing security group configuration from Local to Domain or vice versa requires that the Historian Data Archiver service be restarted for the change to take effect.

Creating a Global Security Group in a Windows 2003 Domain

  1. In the Control Panel, double-click Administrative Tools.
    The Administrative Tools dialog box appears.
  2. Double-click the Active Directory Users and Computer icon.
    The Active Directory dialog box appears.
  3. In the Active Directory Tree display, select the required Domain and select Users.
  4. Right-click Users and select New > Group.
    The New Object - Group dialog box appears.
  5. In the Group name field, enter the name of the new Historian group exactly as you have defined it. Leave the other default options unchanged.
  6. Click OK to create the new group.

Creating a Security Group in a Windows 2008 Domain

  1. In the Control Panel, double-click Administrative Tools.
    The Administrative Tools dialog box appears.
  2. Double-click the Active Directory Users and Computer icon.
    The Active Directory dialog box appears.
  3. In the Active Directory Tree display, select Users.
  4. Right-click Users and select New > Group.
    The New Object - Group dialog box appears.
  5. In the Group name field, enter the name of the new Historian group exactly as you have defined it. Leave the other default options unchanged.
  6. Click OK to create the new group.

Using a Windows 2003 Domain Controller with a Windows 2008 Historian Server

When you use domain security with a Windows 2008 Historian Server and the domain controller is a Windows 2003 controller, you must configure the Historian Data Archiver service to log on as a valid domain account and you must add the user right Act as a Part of the Operating System to its list of rights.
  1. Set up the log-on of the Historian data archiver service:
    1. In Control Panel > Administrative Tools, double-click Services.
      The Services dialog box appears.
    2. Double-click Historian Data Archiver.
      The Service dialog appears.
    3. In the Log On As pane, click This Account and select a domain user account.
    4. Click OK.
  2. Add the Act As Part of Operating System right to the domain account:
    1. In Administrative Tools, double-click Domain Security Policy.
      The Default Domain Security Settings dialog box appears.
    2. In the Security Settings tree, select User Rights Assessment from Local Policies.
    3. Double-click Act as a part of the operating system policy.
    4. Select Define these policy settings check box, and click Add User or Group.
      The Add Users and Groups dialog box appears.
    5. Select your domain user name.
    6. Click Add and click OK
    7. In Services, restart Historian Data Archiver.
      You should now be able to log on to Historian Administrator using Domain Security.

      If you attempt to log on to the Historian Data Archiver as a Local System Account, you may be denied access because the System Account in Windows 2008 is not privileged to access the Windows 2003 Domain Administrator. A valid domain user account, however, is privileged to access the Windows 2003 Domain Administrator if it has also been granted the Act as a Part of the Operating System right.

Configuring Data Archiver to use Active Directory Service Interface

By default, the Data Archiver tries to enumerate all the available domain controllers during startup. If a Primary or Backup Domain Controller cannot be located when the Historian Data Archiver service starts, access to Historian is denied to all users. Also, when you have domain controller machines spread across a wide area network (WAN), you may find that logins are successful but slow.

With the Active Directory Support feature, you can configure the Data Archiver to use a different set of Windows calls called Active Directory Services Interface (ADSI) when using Historian security. Configuring the Data Archiver to use Active Directory Services Interface (ADSI) allows you to:

  • Log in to the Historian even if the Data Archiver is unable to enumerate any domain controllers during the Data Archiver startup.
  • Access a Backup Domain Controller if a Primary Domain Controller is not available temporarily or permanently.

You should configure the Data Archiver to use Active Directory Services Interface (ADSI) only when the Data Archiver fails to enumerate domain controllers.

You can determine whether or not the Data Archiver is able to locate a domain controller by viewing the data archiver.shw log file. In the data archiver.shw log file If "Group Server #01:" is empty, then the Data Archiver is unable to locate a domain controller.
Security Settings
=================
 Group Mode : GLOBAL
 Use Client Windows User for Logon : TRUE
 Security Domain : <your domain>
 Group Server #01 : 

The following procedures provide guidelines for configuring the Data Archiver to use Active Directory Services Interface (ADSI) calls.

Creating a Registry Key and Turning On UseADSICalls

  1. On the Start menu, click Run.
    For Windows 7, Windows 8.1, Windows Server 2008 R2, and Windows Server 2012 R2, click the Windows Start button and click inside the Start Search field
  2. Type Regedit and click OK.
    The Registry Editor dialog box appears.
  3. Open the following key folder:
    HKEY_LOCAL_MACHINE\SOFTWARE\Intellution, Inc.\Historian\Services\DataArchiver\
  4. Add a new DWORD value:
    Enter the name UseADSICalls, and select Base as Decimal.
  5. In the Value data field, type 1.
  6. Click OK.
  7. Close the Registry Editor and configure the Data Archiver service to run as domain administrator.

Configuring Data Archiver to use Active Directory Service Interface

By default, the Data Archiver tries to enumerate all the available domain controllers during startup. If a Primary or Backup Domain Controller cannot be located when the Historian Data Archiver service starts, access to Historian is denied to all users. Also, when you have domain controller machines spread across a wide area network (WAN), you may find that logins are successful but slow.

With the Active Directory Support feature, you can configure the Data Archiver to use a different set of Windows calls called Active Directory Services Interface (ADSI) when using Historian security. Configuring the Data Archiver to use Active Directory Services Interface (ADSI) allows you to:

  • Log in to the Historian even if the Data Archiver is unable to enumerate any domain controllers during the Data Archiver startup.
  • Access a Backup Domain Controller if a Primary Domain Controller is not available temporarily or permanently.

You should configure the Data Archiver to use Active Directory Services Interface (ADSI) only when the Data Archiver fails to enumerate domain controllers.

You can determine whether or not the Data Archiver is able to locate a domain controller by viewing the data archiver.shw log file. In the data archiver.shw log file If "Group Server #01:" is empty, then the Data Archiver is unable to locate a domain controller.
Security Settings
=================
 Group Mode : GLOBAL
 Use Client Windows User for Logon : TRUE
 Security Domain : <your domain>
 Group Server #01 : 

The following procedures provide guidelines for configuring the Data Archiver to use Active Directory Services Interface (ADSI) calls.

Restarting the Data Archiver Service

  1. On the Start menu, click Run.
    For Windows 7, Windows 8.1, Windows Server 2008 R2, and Windows Server 2012 R2, click the Windows Start button and click inside the Start Search field
  2. Type services.msc and click OK.
    The Services dialog box appears.
  3. Right-click the Historian Data Archiver service and click Restart.

Establishing Your Security Rights

Your security identity is established upon connecting to the server. This occurs through the following steps:
  1. Specifying a user name and password of an account.
    Upon connection, the system checks to see if you have a valid Windows 2003 account. If you have supplied a username and password (through the Excel Add-In for example), security checks that user. If username and password are not supplied and you are on a Windows 2003 or Windows 2008 machine or higher, security checks the currently logged in user.
    Note: If you do not pass a domain name the account will be checked locally in the same way a mapped drive attempt happens. You have to specify a username and password that exists on the server.
  2. Determining group membership of that account.
    Once the account is validated, the server determines group membership. For more information on the process and hierarchy of the groups, refer to the Security Checking Process diagram below.
  3. Caching membership profile.
    Once the group and tag membership are determined, it is cached for the connection and not looked up again. If users are added to or deleted from a group, the cache is not updated.
    Note: The cache information is per connection, and not per IP address. In other words, it is cached per application and not per system.

    Figure: Security Checking Process


Implementing Tag Level Security

In addition to defining the iH Tag Admins who have the power to create, modify, and remove tags, you can also define individual tag level security to protect sensitive tags.

Set tag level security in the Historian Administrator. You do not need to use the Historian Security Groups for this security setting. You can use a Windows pre-defined group (power users, for example) or create your own separate group specifically for this function. For more information on creating and adding groups, refer to Setting Up Historian Security Groups.

Users must have iH Security Admins rights to set individual tag level security, browse, or query tags in the Historian Administrator.
Note: Tag security is not enforced in the Trend Client when it comes to browsing the full list of tags. Security, however, is enforced when it comes to trending data for tags for which you have permission. For example, if you are logged into the Trend Client as a user that is a member of the User Group assigned to a tag's security Read Group, you will still be able to browse all Historian tags. However, you are only allowed to trend the tags for which the user is a member of the User Group assigned to the tag's security Read Group,
  1. Open the Historian Administrator.
  2. Click the Tags link.
    The Tag Maintenance screen appears.
  3. Select a tag (or group of tags) from the Tag Name section of the Tag Maintenance screen.
  4. Click on the Advanced tab to display the advanced tag options.
  5. In the Read Group, Write Group, or Administer Group field, select the security group that you wish to assign to the tag from the drop-down list.
    The drop-down list automatically lists all security groups that are defined in your Windows security environment.

    For example, if an iH Security Admins user selects a tag and chooses power users from the Read Group drop-down list, in addition to members of the iH Security Admins group, only a member of the power users group will be able to read data for that tag. Even a member of the iH Readers group will not be able to access data for that tag, unless they are also defined as a member of the power users group.