Getting Started

About Analytic Templates of the SmartSignal Type

An analytic template of the SmartSignal type is an analytic orchestration that includes asset information in the form of available Tags, Key Performance Indicators, and Failure Modes. A tag refers to a sensor or calculated value that is part of an analytic template.

An analytic template of the SmartSignal type also provides the additional configuration information required to enable the advance reliability management features provided by the APM SmartSignal runtime. This runtime provides support for predictive diagnostics that utilize similarity and variable-based modeling techniques as well as a rich function library for doing advanced calculations and a proprietary diagnostic expression language that supports complex rule generation used to identify fault conditions.

Access an Analytic Template of the SmartSignal Type

You can access a analytic template of the SmartSignal type from either the Analytics module or the SmartSignal Maintenance module.

Procedure

  1. Choose one of the following options:
    ChoiceDescription
    Access from the Analytics module
    1. In the module navigation menu, select Analytics > Analytics Templates.
    2. In the menu, select the analytic template that you want to access.

      The workspace displaying a summary of the selected template appears.

    3. Select the SmartSignal link.
    Access from the SmartSignal Maintenance module
    1. In the module navigation menu, select SmartSignal Maintenance, and then select the analytic instance associated with the template that you want to access.
    2. Select the Analytic Info link.
    The page displaying details about the selected analytic template of the SmartSignal type appears in a new browser tab.
  2. Select one of the following tabs to view analytic template details.
    Tab NameDescription
    OverviewDisplays basic information about the analytic template.
    Input TagsDisplays a grid containing input tag data.
    Output TagsDisplays a grid containing output tag data. You can select a tag name to view the output tag expression.
    Constant TagsDisplays a grid containing constant tag data.
    ModesDisplays a grid containing modes data. You can select a mode name to view the mode expression.
    ModelsDisplays a grid containing model data. You can select a model name to view model details.
    Model TagsDisplays a grid containing model tags data.
    Diagnostic RulesDisplays a grid containing diagnostic rules data. You can select a rule name to view the rule expression.
    Tag RulesDisplays a grid containing tag rules data. You can select a rule name to view the rule expression.
    Rule AssignmentDisplays a grid containing rule assignments for the template.

Create a New Analytic Template of the SmartSignal Type

Complete the following steps to create a new analytic template of the SmartSignal type natively in APM.

Procedure

  1. In the Applications menu, navigate to RELIABILITY > Analytics > Analytics Templates.
  2. Select .
    The New Analytic workspace appears.
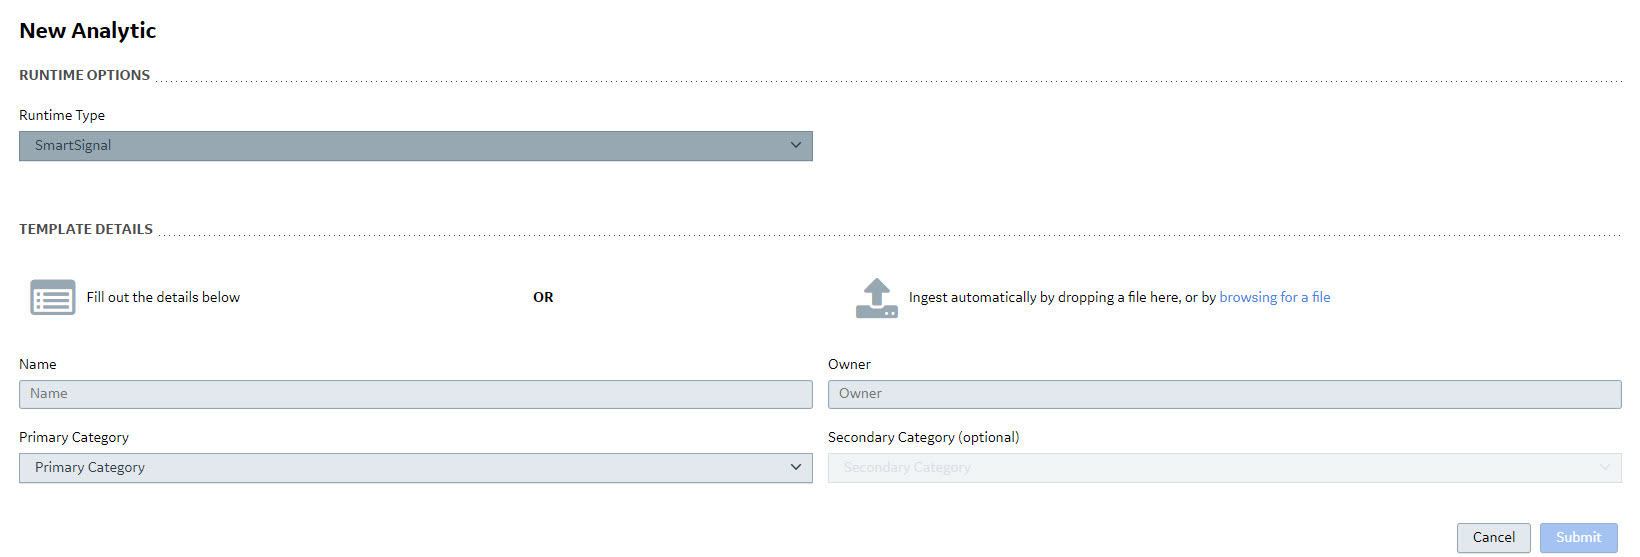
  3. In the Runtime Type drop-down list box, select SmartSignal.

    In the Template Details section, boxes appear in which you can enter information for the analytic template that you want to create.

  4. In the Name box, enter a name for the analytic template.
  5. In the Owner box, enter a name for the owner of the analytic template.
  6. In the Primary Category drop-down list box, select any option.
    Note: Supervised Learning is the option typically used to categorize analytic templates of the SmartSignal type.
  7. Select Submit.

Results

  • The new template is automatically published as version 1.0.0.
  • The page displaying details about the new analytic template appears.

What To Do Next

No deployments are available for the new template yet. To enable deployments, you must first configure tags and rules used in the template.

Copy an Analytic Template

If you want to create a new analytic template that is similar to an existing template, you do not need to reproduce all of the similar data. Instead, you can copy an existing template and modify the copy as needed.

Procedure

  1. In the Applications menu, navigate to RELIABILITY > Analytics > Analytics Templates.
  2. In the list of templates, select the template of the SmartSignal type that you want to copy.
    The workspace for the selected template appears.
  3. In the workspace, select the SmartSignal link.
    The page displaying details about the selected template appears in a new tab.
  4. In the drop-down list box, select Copy Analytic Template.
    The Copy Analytic Template window appears, displaying the default name for the copy of the template in the following format: <Template_Name>_copy.
  5. Optional: As needed, modify the template name.
    Note: Ensure that the template name is unique.
  6. Optional: If you want to access the copied template for editing immediately after you create it, select the Go to the copied template for editing box.
  7. Select Copy.

Results

  • The template is copied, and you can access the copy in the list of templates that appears in the Analytics Templates page.
    Tip: In order to see the new template in the list of templates that appears in the Analytics Templates page, you must refresh the template list.
  • If you selected the Go to the copied template for editing box, the copied template appears in the current page.

What To Do Next

Modify the copied template as needed.

Export Analytic Template to ZIP File

You can export an analytic template to a .zip file.

About This Task

Exporting Analytic template to a .zip file is useful in scenarios where you created a template in one tenant, and you want to reuse it in another tenant. In this scenario, you could export the template from the first tenant and then import it in the second tenant.

Procedure

  1. Access an Analytic Template of the SmartSignal Type.
  2. Select Actions > Export to ZIP.
    Note: If you had modified the template prior to exporting it, but you had not published your changes, a message appears, notifying you that only published changes will be exported and asking you to confirm whether you want to proceed. If you want to proceed without your most recent changes, select Export. If you want to discard or publish your changes before exporting, select Cancel.
    The analytic template is exported to a .zip file.

Export Analytic Template to Excel File

You can export an analytic template to an Excel (.xslx) file.

About This Task

Exporting Analytic template to an Excel file is useful if you want to perform an offline review or you prefer using Excel to update the template attributes and intend to use the update from XLSX option. In this scenario, you could export the template to Excel, update it offline and then import it back to the tenant. It is not a mechanism for transferring templates between tenants. You can update only the latest version of the template. When you export an analytic template to an Excel file, only published changes for the current version of the template are exported.

Procedure

  1. Access an Analytic Template of the SmartSignal Type.
  2. Select Actions > Export to XLSX.
    Note: If you had modified the template prior to exporting it, but you had not published your changes, a message appears, notifying you that only published changes will be exported and asking you to confirm whether you want to proceed. If you want to proceed without your most recent changes, select Export. If you want to discard or publish your changes before exporting, select Cancel.
    The analytic template is exported as a .xlsx file.

Update Analytic Template

You can update an analytic template with the information that you modified in an Excel file that you previously exported. The update process requires the key fields that were written into the export file preserved, otherwise the update operation will be rejected. You can update only the latest version of the template.

Before You Begin

Ensure that the analytic template Excel file that you select matches the analytic template file that was previously exported, and the Protected View has been removed.

Procedure

  1. Access an Analytic Template of the SmartSignal Type.
  2. Select Actions > Update Template via File Import.
    The Update from XLSX window appears.
  3. Select Select File to navigate to the folder where you have saved the analytic template Excel file, and then select Open.
    The template update will begin. If the update is successful, a message appears indicating that the template update has completed successfully.
  4. Select Close.
    The analytic template information is updated with the information from the Excel file, and the template will be locked for editing and is ready for your review.
    Tip: To verify if changes have been imported as expected, select Actions > Compare Versions.

Sync Analytic Templates and Analytic Instances

Sync an Analytic Template across Multiple Analytic Instances

If an analytic template used by multiple analytic instances is modified to create a new version, you may want to update some or all of the analytic instances associated with that template simultaneously. In this scenario, complete the following steps to sync an analytic template across multiple analytic instances.

Before You Begin

Ensure that none of the analytic instances that you want to update is being edited by another user. If another user has locked a analytic instance for editing, you can take edit control from that user.

Procedure

  1. Access an analytic template of the SmartSignal type.
  2. Select Actions > Update Deployments.
    The Analytic template synchronization for <Analytic Template> window appears.

  3. In the window, select the check box next to each analytic instance that you want to sync with the analytic template, and then select Start Updates.
    The sync job begins. Once the job is successfully completed, the selected analytic instances are synced with the selected analytic template.
  4. Optional: If you want to view the status of the sync job, select the Job Details link.
    The SmartSignal Deployments page appears, displaying the Job Status section. The Status column for the sync job that you started displays one of the following values: success or fail.
  5. Optional: If the job failed and you want to view the reason for the failure, select the fail link.
    A window appears, displaying information about the job failure.

Sync an Analytic Instance with an Analytic Template Version

You can sync an analytic instance in SmartSignal Maintenance with an analytic template version added in the Analytics Templates page or the SmartSignal Analytic page.

Before You Begin

Add a new version of an analytic template in the Analytics Templates page or the SmartSignal Analytic page.

Procedure

  1. Lock for editing the analytic that you want to modify.
  2. In the Actions box, select Health > Analytic Template Sync.
    The Select Analytic Template Version window appears.
  3. In the Version drop-down list box, select the template version that you want to use, and then select Continue.
    The Confirm Changes to Analytic Instance window appears displaying a message that indicates whether the selected version contains structural changes.
    Note: SmartSignal only supports synchronization of an analytic instance with an analytic template containing structural changes if the analytic template was added using a transfer file. If you attempt to synchronize an analytic instance with an analytic template containing structural changes that was not added using a transfer file, the Confirm Changes to Analytics Instance window displays an error message.
  4. Select Continue.
    A progress bar appears. When the instance is updated, the screen refreshes, and the updated data for the selected version appears in the table.
  5. Confirm that all data appears as expected.
  6. When you have finished making changes, select Deploy, and then, when prompted to confirm the deployment, select Deploy again.
    Note: If you want to undo your changes, you can select Discard Changes in the Actions menu.

    A notification appears when your changes have been deployed successfully.

Sync an Individual Tag Value with the Template

If you modified a field value in a tag within an analytic instance, the cell for that value is highlighted in the table for that analytic instance. If you want to replace your customized field value in the analytic instance with the value in the template, you can sync that specific value without syncing the entire analytic instance.

Procedure

  1. Lock for editing the analytic that you want to modify.
  2. Optional: If the column containing the value that you want to sync is not already displayed, select , then select the check box next to the column that you want to display, and then select to close the Column Chooser window.
    The specified columns are displayed.

When you access an analytic instance, cells in the following columns with modified values are highlighted in yellow, and the values in the cells appear in bold font:

UnitsStandard UnitsActual High
Actual LowAdaptation HighAdaptation Low
DecimalsStep HighStep Low

In the table for a model, the following additional columns use this formatting:

Alarm TypeResidual (Positive)
Residual (Negative)Filter High
Filter LowFlatline Number
Is DriverIs Independent
Outlier (Negative)Outlier (Positive)
Residual VarianceSpike Sensitivity
SPRT (Negative)SPRT (Positive)
Note: While you cannot modify values in the Residual Variance and Decimals columns in APM, if you imported the analytic from SmartSignal Classic, the value could have been modified in SmartSignal Classic before you imported it.

  1. Hover over the cell that you want to sync with the template.
    The Value is Customized window appears, displaying the template value and the instance value as well as a message indicating that the value is customized and will not be synced with changes to the analytic template.
    Note: If no value appears next to Template Value or Instance Tag Value, that means a value for that cell was not specified in the template or instance, respectively.
  2. Select Sync to Template.
    The value in the specified cell is updated to match the value in the template.
    Note: If you synced standard units which had been previously modified with the Convert Threshold Values toggle switched to the on position, any threshold values associated with that tag that are still synced with the template are also updated to match the new standard unit. However, if you modified a threshold value in the instance, that value is not updated when you sync the standard units. If you want to sync a modified threshold value with the template, you must sync it separately.

Reorder Tags in an Analytic Template

Procedure

  1. Access an analytic template of the SmartSignal type.
  2. In the Actions menu, select Charting > Reorder Tags.
    The Drag and drop to reorder tags window appears.
  3. Choose one of the following methods to reorder tags:
    ChoiceDescription
    Drag and dropDrag and drop tags to arrange them in the order in which you want them to appear.
    Order by default positionIn the Order By box, select Default Position to arrange the tags by their default position, that being the order in which the tags were added to the analytic template.
    Order by nameIn the Order By box, select Name to arrange the tags in alphabetical order.
  4. When you have finished reordering tags, select Save.
    The tags are reordered and appear in the specified order in the page for modifying the analytic template.

Reorder Tag Groups in an Analytic Template

In the SmartSignal Analytic Template editor, when more than one group is included, you can define the order in which the tag groups should be displayed in Analysis.

Before You Begin

The tenant must have been granted access to the SmartSignal Analytic Template Edit access rights to use this functionality.

Procedure

  1. Access an analytic template of the SmartSignal type.
  2. In the Actions menu, select Charting > Reorder Tag Groups.
    The Drag and drop to reorder tag groups window appears.
  3. Choose one of the following methods to reorder tags:
    ChoiceDescription
    Drag and dropDrag and drop tag groups to arrange them in the order in which you want them to appear.
    Order by default positionIn the Order By box, select Default Position to arrange the tag groups by their default position, that being the order in which the tag groups were added to the analytic template.
    Order by nameIn the Order By box, select Name to arrange the tag groups in alphabetical order.
  4. When you have finished reordering tag groups, select Save.
    The tag groups are reordered and appear in the specified order when displayed.

Configure Fixed Scale Charting by Mode in an Analytic Template

About This Task

Note: This action will only be enabled when the published template has more than one mode defined.

Procedure

  1. Access an analytic template of the SmartSignal type.
  2. In the Actions menu, select Charting > Fixed Scale by Mode.
    The Fixed Scale by Mode window appears.
  3. In the fields corresponding to the tags you want to control the Y-Chart Axis, set either the Min and/or Max value. If your template is defined with multiple MODES, then you can overwrite the setting at the MODE level. This allows you to have a different fixed scale for your model tags based on the mode.
  4. When you have finished setting min/max values for your tags, select Save.