
Overview
About SmartSignal Maintenance
In the SmartSignal Maintenance module, you can access, create, and modify the SmartSignal analytic instance (that is, SmartSignal analytics that have been mapped to APM assets) and models in your system.
Access an Analytic Instance
You can view and modify the details associated with the analytic instances, modes, and models in the SmartSignal Maintenance module.
Procedure
- To search for a specific analytic instance, mode, or model, specify the search criteria in the Search... box, and then press Enter.Tip:
- To view the hierarchy filter options, select
 in the hierarchy header .
 - To access a list of analytics that you have locked for editing, switch the My Locks toggle to the on position.
- To access a list of the SmartSignal analytic instances, switch the SmartSignal toggle to the on position.
- To include inactive SmartSignal analytic instances, switch the Inactive Instances toggle to the on position.
- To include inactive SmartSignal analytic instance models, switch the Inactive Models toggle to the on position.
- To refresh the hierarchy in the Analytic Instances pane, select
 .
. - To view the hierarchy in a list format or a hierarchical format, select
 or
or  , respectively.
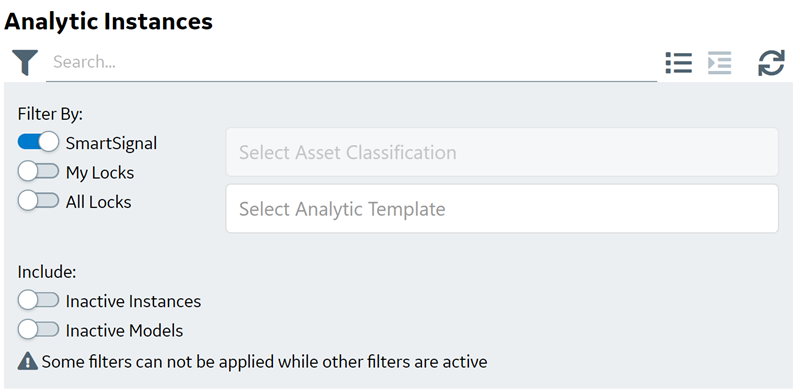
- To view the hierarchy filter options, select
- To close the Analytic Instances pane, select
 , or select an area of the page outside of the pane.
Results
Access the Analytic Template or Asset Associated with an Analytic Instance
You can access the SmartSignal analytic template or APM asset associated with an analytic instance.
Procedure
Add an Analytic Instance
You can add a new analytic instance for a selected asset directly from the SmartSignal Maintenance module.
Procedure
- Select
 , and then select Add Analytic.The Guided Setup window appears. This workflow proceeds through the process required to configure, map tags, train and build your models, and deploy.
Results
- Create Analytic & Close: The page for the newly created analytic instance appears, displaying information that is required to configure the analytic. By default, the page appears in a locked mode and is available for editing.
- Create Analytic & Continue: The setup proceeds to the Tag Mapping step. For more information, refer Guided Setup.
View Asset Details
You can view the asset details of an asset associated with an analytic instance directly from the SmartSignal Maintenance module.
Procedure
- Select , and then select View Asset Details.The Asset Instance window for the selected asset appears in a new browser tab, displaying detailed information about the asset to which the analytic instance is associated.
Sync Analytic Templates and Analytic Instances
Sync an Analytic Template across Multiple Analytic Instances
If an analytic template used by multiple analytic instances is modified to create a new version, you may want to update some or all of the analytic instances associated with that template simultaneously. In this scenario, complete the following steps to sync an analytic template across multiple analytic instances.
Before You Begin
Ensure that none of the analytic instances that you want to update is being edited by another user. If another user has locked a analytic instance for editing, you can take edit control from that user.
Procedure
- Select .The Analytic template synchronization for <Analytic Template> window appears.

Sync an Analytic Instance with an Analytic Template Version
You can sync an analytic instance in SmartSignal Maintenance with an analytic template version added in the Analytics Templates page or the SmartSignal Analytic page.
Before You Begin
Procedure
Sync an Individual Tag Value with the Template
If you modified a field value in a tag within an analytic instance, the cell for that value is highlighted in the table for that analytic instance. If you want to replace your customized field value in the analytic instance with the value in the template, you can sync that specific value without syncing the entire analytic instance.
Procedure
- Optional: If the column containing the value that you want to sync is not already displayed, select
 , then select the check box next to the column that you want to display, and then select
  to close the Column Chooser window.The specified columns are displayed.
When you access an analytic instance, cells in the following columns with modified values are highlighted in yellow, and the values in the cells appear in bold font:
| Units | Standard Units | Actual High |
| Actual Low | Adaptation High | Adaptation Low |
| Decimals | Step High | Step Low |
In the table for a model, the following additional columns use this formatting:
| Alarm Type | Residual (Positive) |
| Residual (Negative) | Filter High |
| Filter Low | Flatline Number |
| Is Driver | Is Independent |
| Outlier (Negative) | Outlier (Positive) |
| Residual Variance | Spike Sensitivity |
| SPRT (Negative) | SPRT (Positive) |